Travelling in the winter is a whole other animal. For those that have done it before, you know what I’m talking about but if this is your first time, first of all, you’ll be glad you came across this article, and two, unless you’re well-prepared, travelling below freezing is not fun at all.
Everyone’s going to have a little bit of a different take on what to bring but with this cold weather packing list, you’ll have a really good idea of what to bring.
Read more about winter travel adventures
- The ultimate 8 day Iceland itinerary
- Unique winter getaways in Ontario
- How to plan a Muskoka winter getaway
- Snowmobiling on the Trans-Quebec Trail 83
How to get the best travel deals
- Car rentals – stop getting ripped off and learn about rental car coupon codes.
- Hotels – Use corporate codes or get Genius 2 tier with Booking.
- Flights – Have you ever heard of the “Everywhere” feature?
- Deals – Bookmark this travel deals page.
In This Article
What It’s Like Travelling in the Winter Below Freezing

Travelling in the winter time isn’t for everyone but it can be with the right preparation.
When we say cold weather travel, we aren’t talking about a cold day in New York City. This guide is meant for those kind of trips where you’ll be going somewhere that averages -10°C (14°F), most of your activities will be outdoors, and you’ll be relatively active.
Before we jump into the cold weather packing list itself, let’s set the stage and explain why it’s not just a matter of slapping on winter clothes you have at home.
Our winter experiences on the Magdalen Islands
We’re not blowing any smoke (or snow) here with just another list, but instead, what we’ll be delving into comes from recent experience travelling to the Magdalen Islands (Îles de la Madeleine) at the end of February.
As an archipelago in the Gulf of St. Lawrence, belonging to Quebec but also closer in distance to the Maritime provinces and Newfoundland, we experienced a wide range of weather, but all of it was cold.
On most days, the average was -10°C (14°F) but being an island, we were also treated to strong winds of 40 km/h (25 mph) which made it feel colder than -20°C (-4°F). There were sunny days but there was also harsh snow where the wind would pummel ice into your face.
You can read more about our trip to Iles de la Madeleine but it was essentially a road trip around the 6 islands that are connected by sand dunes and bridges. With our rental car, we drove to all of the main sights, and for the photography, we often stuck around in a single location to fly the drone or shoot photography.
It’s not a part of Canada that many people get to see but the winter is absolutely stunning in the winter with its snow-capped landscapes, colourful houses, red cliff coastline, frozen dunes, and harp seals if you’re lucky enough to do Chateau Madelinot’s Seal Pup Observation.
BEFORE YOU CONTINUE
Learn about the Magdalen Islands in Quebec and some of the things we were did there in the winter time.
10 reasons why travel below freezing is so challenging
The temperature and the elements is one thing but how does that actually affect the way you travel? Some are obvious, and others not so much.
- Winter clothes take up more space – When you’re packing your suitcase, whether carry-on or check-in, everything is going to be bulkier and heavier. Before you know it, you’ll be out of space so you have to be smart about it and we share a ton of valuable tips below.
- Cold outside and hot inside – When you’re in the car or indoors at say a restaurant, it’s nice and toasty but once you’re outside, you’re freezing again. Proper layering is the way to go here so you can quickly shed layers or zip down if you need to or put them all back on.
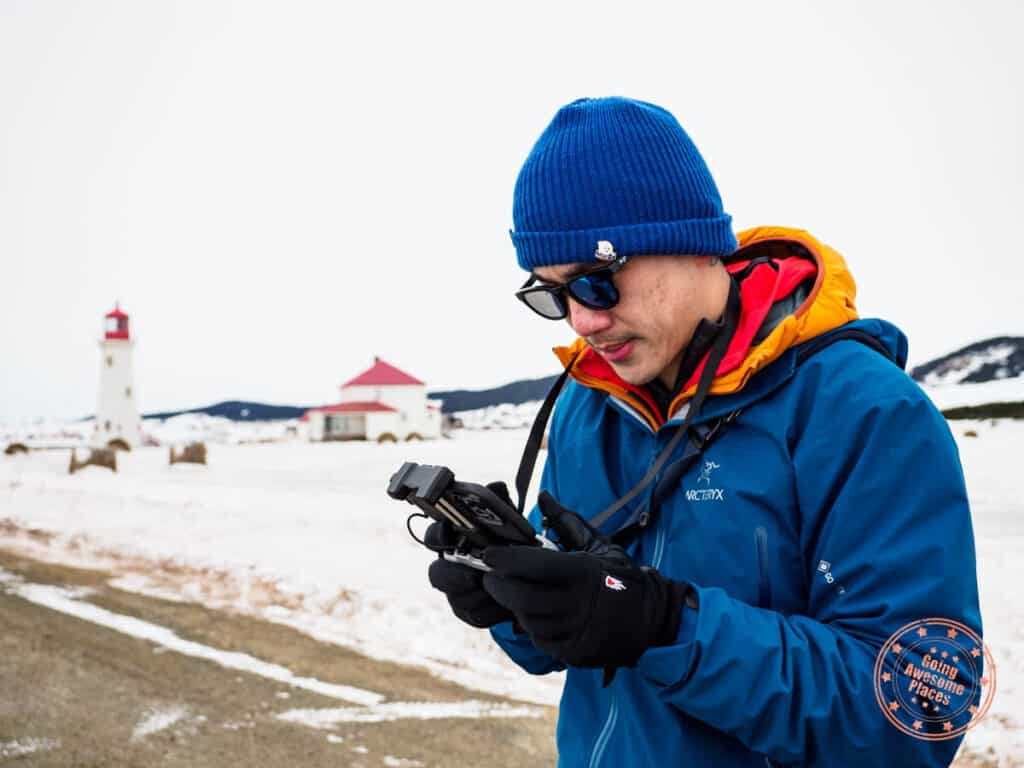
- You need good gloves – Unlike snowboarding or skiing, you’ll need access to your hands a whole lot more when travelling in cold weather and that’s because you’ll be using your camera, smartphone, and maybe even flying a drone outdoors. Touchscreen gloves are essential but you also need gloves that can warm up quickly in mitten mode and that’s where The Heat Company comes in.
- After fingers are the toes – In below freezing temperatures, your fingers will get cold first but after that your toes will begin to feel it. This is contrary to what you might think. It’s easy to layer for your body and legs but your fingers and toes are the weakest link.
- Beware of snow storms – Clear and sunny days are great but the weather can turn nasty if wind picks up and it starts to snow. Visibility can be a problem and your face will also take a beating.
- Dexterity compromised – You’ll feel compelled to take your gloves off but you really should keep them on to not lose too much heat. That said, no matter how good your gloves are, your dexterity just won’t be as good so you’ll have to be patient and make things as easily accessible as possible in your backpack and also your car.
- Battery life cut down in half – If you’re using your smartphone and camera extensively in the cold, you’ll notice batteries die very quickly. Don’t let the numbers deceive you either because some camera batteries will show 80% and then fall to 30% all of a sudden.
- Expect the unexpected – We’ve talked about how changing weather can affect what you wear but it can also mean that roads might be too dangerous to drive, tours get cancelled, or businesses don’t open. Flights might get cancelled or delayed too. Winter itinerary planning requires wiggle room to move things around and just having the right mentality.
- Can’t stay outside for long – Even with the warmest of layers, you won’t want to stay out for long periods of time which is why a road trip works well so you can jump in and out of the car, allowing you to warm up in between.
- Places become inaccessible – Whether because places are snowed in, frozen through, or roads aren’t maintained, there will be places that you can’t reach or are unsafe to do so. In some cases, you’ll need a specialized guide.
What is the layering system?

Geeking out for a moment, when you fall into the rabbit hole of technical outdoor gear, the concept of the 3 layer system comes up a lot. For a true below freezing winter packing list, I think a 4 layer system works the best
There are a ton of layering guides out there including ones by Arc’teryx, MEC, or REI but honestly the concept is really simple.
First Layer – Base Layer
This is that “next to skin” layer that is meant to wick away moisture to the surface of the fabric so it can evaporate. As you sweat, you don’t want it to sit on your skin because that’s what will make you feel cold.
These are designed to be a snug fit while allowing you to comfortably move as well.
Merino wool is often the material-of-choice but synthetic materials or hybrids of elastane and merino are just as effective and potentially more comfortable if you find merino too itchy.
Second Layer – Mid-Layer Fleece
The second and third layers that we have here are normally combined but for added warmth and versatility, it makes sense to double down on the mid-layer.
Mid-layer is just a fancy term for insulation. Now that your base layer has wicked away that moisture, this is a layer that continues to wick outwards while also trapping your body heat to keep you warm.
A solid technical fleece like the Arc’teryx Kyanite AR Hoody, Delta LT Zip, or Patagonia R1 Air Crew work well. They’re highly breathable pieces, close to the body, and offer that first layer of insulation.
What we like about fleeces is that they are useful in other scenarios too if you just want a hoody. They excel in high output activities and are great as an additional layer in warmer temperatures.
Third Layer – Mid-Layer Synthetic Down
A mid-layer jacket is meant to provide additional insulation while also being lightweight and layer-able. Breathability is also key here because you still want to move away as much moisture as you can.
Through advancements in synthetic down, there are new products in this category that fit this extremely well.
The one that I’d highly recommend is the Arc’teryx Proton LT Hoody for cold weather travel. I personally own this piece and have been the happiest with this piece of gear because of how comfortable it is to wear. It’s light, highly breathable, velvety soft, and very warm.
Why synthetic down? A huge advantage to synthetic down is that it will continue to perform even when wet, is hypoallergenic, and is less expensive.
In many respects, these can be standalone outer jackets but since they aren’t fully waterproof and don’t offer too much wind protection, that’s why you need a fourth layer.
Fourth Layer – Outer Shell
This is the final layer to complete your winter set up. The outer shell is going to give you the protection from the elements whether it be rain, snow, ice, and wind.
The industry-leading material you’re looking for is Gore-Tex and again, one company that does it better than anyone else is Arc’teryx based in Vancouver, Canada.
They have a number shells of varying so definitely do your homework but the Beta Jacket is superb all-around. The best thing is that these shell jackets is that you can use them skiing, snowboarding, or just as a rain jacket.
Cold Weather Packing List
If you’re planning that trip to somewhere super cold whether it be extreme like the Antarctica to see king penguins, Churchill, Alberta for polar bears and belugas, or baby harp seals in Îles de la Madeleine (Magdalen Islands), you’re going to want to be as prepared as possible.
This cold weather packing list isn’t meant to be definitive but it will give you guidance on what you should pack, identify gaps in the gear you already have, what you may not have thought of, and what you should leave at home.
As a guy, this list will undoubtedly be a bit biased but everything below is from real experiences travelling to a frosty Îles de la Madeleine in the winter and what we learned.
Lastly, not only do we cover clothing in this list but also other travel gear, and in particular, camera gear.
Jackets

Two primary pieces in your layering system are the outer shell and mid-layer jacket.
- Arc’teryx Zeta AR – This model has been brought over to the Beta line so I’d recommend the new Beta Jacket. A full waterproof shell that uses Gore-Tex is going to serve you the best to keep you protected.
- Arc’teryx Proton LT Hoody – This will easily be one of your favourite pieces of clothing in the winter. I could easily wear this as a stand-alone piece all day long. In below freezing temperatures, this’ll provide a bulk of the warmth.
Post-trip thoughts: Both pieces performed admirably on our trip to the Magdalen Islands. I wore them every single day without fail. The snow beaded off the shell, the large front pockets were very handy, and the hoods on both jackets were helpful when we really needed protection from the blizzards.
Technical Fleece

A good fleece is necessary but a quality technical fleece is even better if you can swing it. These served as the second layer.
- Patagonia R1 – This is one of the original versions that I actually purchased second hand and has a Polartec Power Dry fleece that allows it to be so thin, breathable, warm, and lightweight. A modern alternative is the Patagonia R1 Air Zip-Neck.
- Arc’teryx Delta MX – While this is currently being updated to a newer version, I love this technical fleece because it’s one of the few that has a built-in balaclava in its scuba hood. In the meantime, the Delta LT is a great alternative.
Post-trip thoughts: Both fleeces performed as I expected and were an integral part of the layering. That said, if you really wanted to pack more optimally, you could just bring one. I had both with me because I wanted to test which one was better. This is a layer that doesn’t necessarily need a hood and so a half-zip is suitable for your needs. The Delta MX’s balaclava was nice to have but the truth is the Polar BUFF performed better in extreme cold.
Base Layers

Base layer tops are like underwear. They’re next-to-skin and since the other layers are re-used throughout your entire trip, you’ll probably want a couple of these in your rotation.
That said, if you purchase base layers that can which moisture and odour away, you really don’t need as many as you think.
Base layers are accumulated overtime which is why there’s such a wide range that you see here. There are 6 shirts here, 2 of which are short sleeve (Arcteryx LEAF merino and a Uniqlo HeatTech) which are meant for additional layering.
One thing you’ll notice is that there are no t-shirts here at all which felt incredibly unusual but it really doesn’t make a lot of sense when technical base layers perform a lot better. Cotton, while comfortable, does not wick moisture and odor. Plus, long sleeve make the most sense for cold weather.
Post-trip thoughts: In retrospect, I brought too many base layers. Ultimately, I ended up wearing the Arc’teryx Motus AR crew, icebreaker BodyfitZone half zip merino 260, and Patagonia Capilene midweight zip-neck. Everything worked fine but, I realized I was just doing it to change it up. The one piece I never wore was the Uniqlo HeatTech because it’s meant to absorb moisture and convert it to heat as opposed to wicking it away.
Bottoms

When talking about the layering system, we only talk about the top but what about protection for your legs?
Well, it works in a similar way except there aren’t as many layers involved. After your underwear, there’s a base layer, followed by a fleece, and finally a waterproof shell.
Here’s what you can look at packing:
- icebreaker BodyfitZone Merino 260 3/4 Leggings – These 3/4 size merino tights are great for skiing so I’ve repurposed it here. This is one of 3 base layer pants that I packed (middle packing cube). The 4th pant in the photo are for my pyjamas.
- Arc’teryx Gamma AR – Worst case, you can layer these pants over the fleece to give you even more warmth. These are also meant to just be standalone pants when you want something less crunchy and more casual.
- Arc’teryx Beta AR – This is your outdoor shell pants. Featuring Gore-Tex, you’ll be waterproof top the bottom.
- Arc’teryx Cormac Pant – These are actually my super comfy work-out/jogger pants that I wear around the house but they make a great fleece-like layer. They’re currently not available but usually come back in early fall.
- Arc’teryx Motus AR Bottom – Unlike the Cormac, this has a thicker weight fleece and
- Swim suit – If your hotel has a pool or hot tub, don’t forget to pack one of these!
Post-trip thoughts: Like the base layer shirts, I felt like I packed too many and just used the icebreaker most of the time. While you might say “eww”, with underwear on and barely sweating, I felt fine re-using them. The Gamma AR, I truthfully only used when we were in Montreal for an extra few days, and between the two fleece pants, the Motus AR came out on top.
Underwear and Socks

The unglamorous part of any packing list.
- ExOfficio Give-N-Go Boxer Briefs – You can do one pair a day but with ExOfficio, you could easily do with half if you master how to hand wash your clothes. Read this full ExOfficio Boxers review to find out why these are must-have.
- Various thermal socks – If you ski or snowboard, you’ll have a few pairs of these wool socks. The best in the market is the icebreaker Merino Ski+ Medium Over the Calf Socks. For extra warmth, merino liner socks (far right) can help.
Post-trip thoughts: We washed our underwear everyday and I think I could’ve easily done with 3 or 4. With socks, we washed just as frequently but in the end, I liked to the icebreaker merino ski socks and liner the most. I had a pair of really high ski socks but they were a tad uncomfortable near the knee. I think I could’ve done with again only 3-4 pairs of socks.
PJs and Casual Clothing

Don’t forget about these items in your cold weather packing list!
- Pyjamas – These are easy to forget. Granted, they’re a bit of comfort item but I do like having separate PJs as opposed to just wearing next day’s clothes.
- Casual set – This is your go-to set of clothing (jeans and shirt) for flying days and also when you don’t want to look like you just came back from climbing a mountain. This is great for when you’re eating at restaurants or want a more relaxed look at the hotel.
Winter Accessories
The concept of layering permeates into almost everything including gear for your hands, head, and neck.
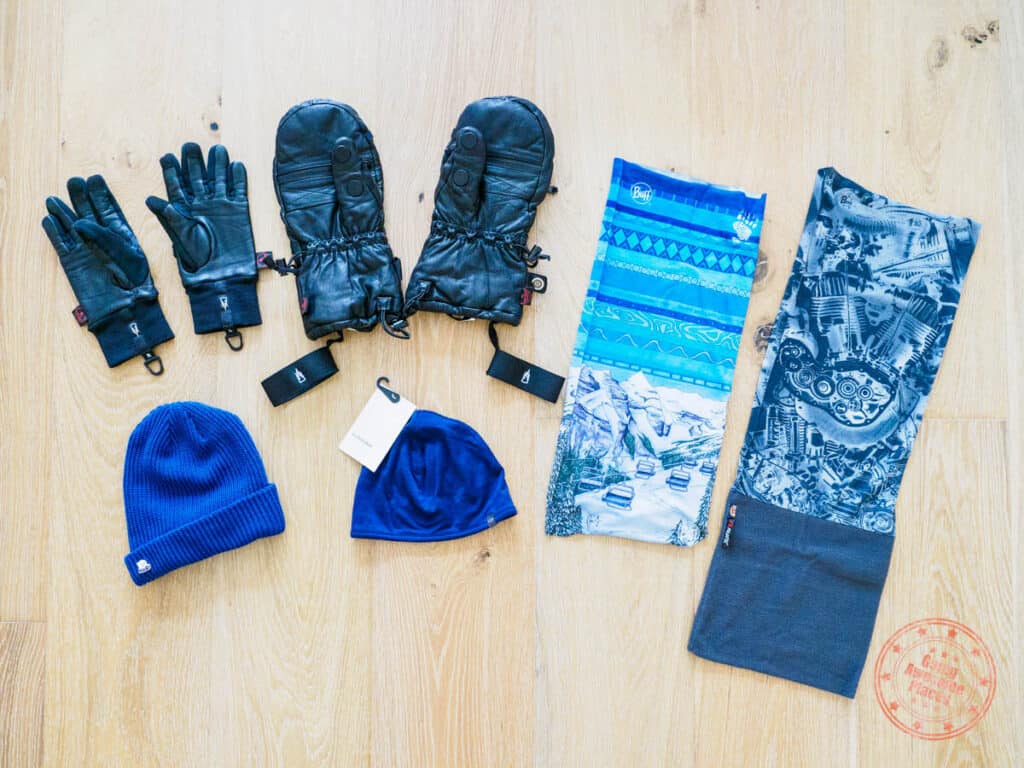
- The Heat Company Durable Liner Pro – The layering continues with this nifty glove system that has roots in the military but really taken up by the photography community. This liner glove has a pocket for hand warmers and is touch screen compatible.
- The Heat Company Shell Full Leather – The magic of The Heat Company comes with these shell mittens that open up to reveal the liner gloves so you have full access to your fingers which makes operating your smartphone, drone, and camera possible.
- Original BUFF – The idea is to have a “base layer” BUFF.
- Polar BUFF – The Polartec fleece provides the warmth around your neck while the rest of the BUFF gives your face protection which means you don’t need to travel with a neck gaiter.
- Blue Toque – A must-have and while you’d think for really cold weather, you might need something extra but your standard toque (what we call a beanie in Canada), is totally enough. If you’re looking for something nice to add to your kit, check out the Bird Head Toque.
- icebreaker Merino Pocket Beanie – A beanie meant for layering if you feel like your head gets cold easily.
Post-trip thoughts: The extra Original BUFF and pocket beanie were never used because I found that the one layer was totally warm enough so they ended up being redundant. I will say that I was very happy with the The Heat Company. This is truly the missing link for how to survive in below freezing temperatures. No more having to constantly take off your mittens to expose your naked fingers to being able to use your devices. Completely game-changing.
The Heat Company Promo Code

There’s a hidden 10 pack hand warmer page on The Heat Company’s Canadian page and if you use code GOINGAWESOMEHEAT, those hardwarmers are free for every single purchase.
Footwear

In extreme winter conditions, your fingers will get cold first and your toes will follow. Solid footwear and being prepared for ice is key.
- Sorel Buxton Winter Boot – This winter boot has been discontinued but something like the Sorel Glacier XT or Caribou Wool Boot. These are fully waterproof and rated for -32°C (-25.6°F).
- STABILicers Ice Cleats – The boots can handle snow but on extremely icy conditions you’ll want ice cleats to give you that bite.
- Rainbow Flip Flops – Our favourite sandals and great for the pool or use in the hotel room.
Post-trip thoughts: The boots were great but if you stay out in the cold for a really long time, the chill will eventually take over. The STABILicers were a bit disappointment because they kept falling off on the few occasions that we faced a lot of ice. I’d definitely pack one for a trip like this but I might look at getting better crampons. If you’re in Canada, MEC has MICROspikes which come highly recommended.
Handwarmers

Europeans swear by The Heat Company hand warmers but in North America, it’s much easier to get HotHands.
You can easily pick up a box of HotHands which include 24 hand warms and 8 pair of toe warmers. You might not need them all but
Post-trip thoughts: We weren’t shy about using these because we packed the entire box. The hand warmers were super easy to use with The Heat Company gloves but Chantelle’s basic liner gloves which didn’t have pockets made it near impossible to use properly. We only used the toe warmers on the especially cold days but I’ll be honest in that it was difficult to tell if they were working because the cold was so overpowering.
Daily Use Gear

This is a bit of a catch-all for a bunch of things that I didn’t feel need to be broken down into smaller categories.
- Oceanic OCS Watch – I know a dive watch is totally overkill but it’s the only one suitable for outdoor adventures. This is simply a reminder to pack a watch.
- Maui Jim Chee Hoo – Maui Jim makes the best lenses hands down so if you’re in the market for one, make sure you check them out.
- Sea to Summit Wallet – This is a great wallet for travel that’s lightweight, water-resistant, and just has a ton of pockets.
- Fenix HM65R Headlamp – If you plan on doing any sunrises or sunsets, make sure you have one. We did a full review of the best camping headlamp and we were very impressed.
- Hydroflask 16oz Coffee – Drink water from the tap, boil water, or fill it up with coffee.
- Braun Shaver – Another one of those comfort items that makes life a lot easier on the road.
- Peak Design Small Wash Pouch – All your toiletry items will fit inside in my new favourite toiletry bag. Make sure to watch our video review. Oh and just because it’s winter doesn’t mean you don’t need sunscreen!
Post-trip thoughts: Since we never really got to do a proper sunset, the headlamp didn’t get much use but I’d still recommend packing one. The watch was another piece of gear that I ended up ditching mainly because with all of the layers and tight fitting seals around the wrist, the only way to use the watch was to strap it overtop the outer shell. This worked but was terribly inconvenient when taking off the jacket.
Backpack and Organizers

So what should you use as your day pack? This is going to vary quite a lot from person to person depending on what type of traveller you are and how much camera gear you’re hauling but here’s a look at what I’m currently using.
- Peak Design 30L Travel Backpack – This is the smaller sibling to the 45L Travel Backpack that I normally use. It’s a bit more compact and slim but still works with the medium camera cube inside so all of my gear can fit inside.
- Peak Design Tech Pouch – The essential tech organizer that holds everything from my earbuds to charging blocks, dongles, cables, and more.
- Sea To Summit Document Case – This is useful for any printouts of travel documents and if you need your drone license with you.
- Peak Design Field Pouch – Another nifty electronics organizer that allows for quick access to gear inside the backpack. We use this to organize the Mavic 3 batteries and the GoPro Hero 10.
- Eagle Creek Sac – A miscellaneous organizer for larger charging blocks.
- Black Drawstring Bag – If you’re travelling with a ton of GoPro mounts, another bag is in order.
There are also a few other organizers that you may have seen in other sections. Use packing cubes! We never travel without them and should definitely be part of your winter travel packing list.
- Eagle Creek Pack-It Specter Cube – Tried and true packing cube for rolled up shirts.
- Peak Design Packing Cubes – There are two sizes (small and medium) and both are handy to use. I love that they have compression zippers and they have built in dirty clothes compartments.
- Mesh Bags – Having an assortment of drawstring mesh bags in your packing arsenal is always a good idea.
Post-trip thoughts: It may seem overkill but organizers like these help keep things a little less chaotic in your suitcase and backpack. Overall, the 30L Travel Backpack performed admirably as a carry-on and daypack throughout the trip especially since there were weight restrictions flying with the smaller airline, PASCAN Aviation to get to Iles de la Madeleine in Quebec. For the trip, I didn’t end up using the GoPro a whole lot so it did feel like the mounts were really wasting space but I wouldn’t have known pre-trip how things were going to play out.
Camera Gear

We know that sometimes it’s fun to take a peek into a creator’s bag to get a glimpse into the camera gear they use. This is an updated look at what Going Awesome Places uses to produce all of the content that we do.
I’m a Micro Four-Thirds shooter and I’m an example of someone that has had a lot of success with the Olympus (now OM System) platform.
There’s a lot going on here so here we go. Let’s start top left and make our way to the bottom right.
- LensPen – With snow and rain, you’ll definitely need to properly clean your lens along the way.
- Instax Mini90 – The fun camera that is a throwback. Completely impractical but could be one of those things that you collect when you travel.
- Formatt Hitech Long Exposure Kit – This is the Elia Locardi kit with a custom adapter for the 7-14mm lens.
- Giottos Rocket Air Blaster – Use this in combination with the LensPen to clean your lenses.
- DJI Mavic 3 Wide-Angle Lens – Add-on lens that allows for a 108° field of view.
- DJI Mavic 3 ND Filter Set – The ND4/8/16/32 set that comes with the Mavic 3 Fly More Combo.
- Rode Wireless Go – Wireless mic system that we’ll combine with a lav mic for any scripted audio shots.
- Peak Design Creator Kit – This makes it super easy to use the Peak Design Everyday Case in both horizontal and vertical modes with the tripod.
- GoPro Hero 10 – Action cam that you’ll want to have if you’re planning on doing any winter sports or unique activities such as snowmobiling and snowkiting.
- GoPro Charger + Case – I love this charger and storage case for the new GoPro batteries and microSD cards. Notice that there is a white battery in there. This is the new GoPro Enduro battery which is optimized for cold weather performance.
- Rode VideoMicPro – Shotgun mic with DeadCat for video situations where it doesn’t make sense to mic someone up and just want to shoot directional audio.
- Peak Design Travel Tripod – This is the carbon fiber version and our go-to tripod now.
- Ulanzi Pocket RGB Video Light – We used to run the Aputure AL-MX but this is much more compact, has a durable silicone diffuser, and has colour as well.
- Mavic 3 Fly More Combo – This is an upgrade from the Mavic Air 2 and while there’s been a lot of controversy about it, you won’t find a better drone for photos and video especially in cold weather and windy conditions. I also added this lanyard neck strap for the controller which I find make things so much easier.
- Olympus MC-20 2X Teleconverter – If there’s any potential wildlife, a teleconverter like this is essential.
- Peak Design Mobile Tripod – A nifty little piece of gear for your MagSafe compatible smartphone that can be a mini selfie mount or tripod on a table or flat surface outside without having to pull out the full tripod.
- Olympus 100-400mm Lens – It’s crazy that this 200-800mm full-frame equivalent lens in such a compact package.
- Olympus 7-14mm Lens – Ultra wide angle that’s great for vlogging, video, landscape, and astrophotography.
- Panasonic-Leica 10-25mm Lens – The ultimate video lens with it’s f/1.7 aperture.
- Olympus EM-1 Mark 3 Body – The ultimate photography and videography camera system that doesn’t get a lot of attention in the industry. This will soon to be replaced by the OM System OM-1.
Post-trip thoughts: We used almost everything that you see above with a few exceptions. The GoPro itself didn’t get a ton of use other than for timelapses and some video from the car. We also didn’t get a chance to use the Mavic 3 wide-angle lens because I was always in favour of using ND filters. The Formatt Hitech filters also didn’t get touched at all as there wasn’t a landscape that really called for it and I much rather be nimble and on the move than set up a fixed shot. The mobile tripod also didn’t get a ton of use since we were mostly outdoors. Lastly, we also brought a second body and the 12-40mm lens.
Suitcase
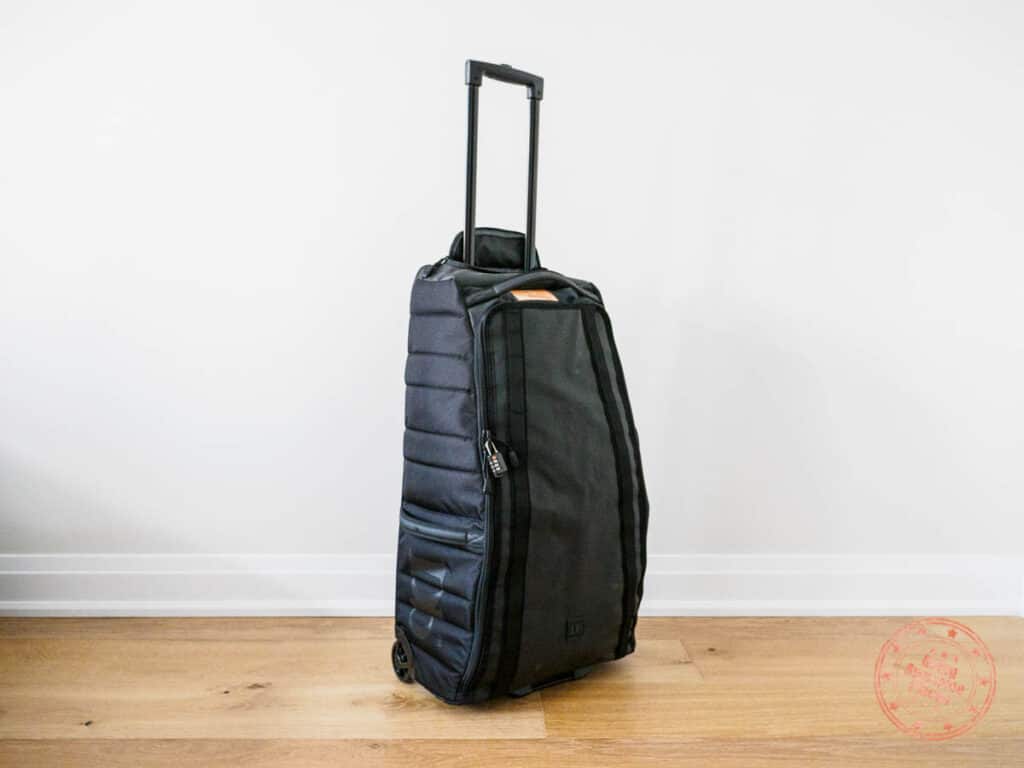
We recently snuck in the Db Journey Strøm 60L Rollerbag into our Camping Gift Ideas and has quickly become one of our favourite suitcases to travel with.
This is a bit of an unconventional shape for a check-in bag but I love how cavernous it is inside, allowing you to fit in way more than a standard 26″ spinner luggage.
The only caveats to this bag are that it doesn’t have 4 wheels and because it’s a taller bag, maneuvering it around corners and objects can be trickier.
Car Accessories

A quick note for those that will be renting a car for their winter trip. With batteries being a big problem, you’re going to want to take every moment you can to recharge.
Without knowing what type of car you’ll have, I’d recommend that you pack at least two car charger adapters. At the same time, make sure you get two that offer different USB ports and are dual outlets.
- UGREEN Dual USB-C Car Charger – This is what’s on the right. There are so many cables that are USB-C on both ends that it makes sense to have one of these. You’ll see that I’m directly charging my Olympus camera from the car adapter. At 40W and support for PD 3A, this is a quick charge. You’ll also be able to charge your DJI Mavic 3 drone batteries with the included dock this way.
- Anker Dual USB Car Charger – This isn’t exactly as what I have on the left but essentially this is a 36W charger (18W each) that will charge your phones and other devices quick.
Make sure to not forget these!
It wasn’t possible to photography every single item but there are a few other additional items that are worth pointing out so you don’t forget.
- Chapstick – Anywhere cold is going to be incredibly dry and so having good chapstick is important.
- Hand cream – Like your lips, your hands are also going to dry up and get uncomfortable quick.
- Binoculars – On the Magdalen Islands, we were seeking out seals and foxes so my wife had binoculars on hand to look for them.
- Travel insurance – You could say that travel in the winter is that much more dangerous because of the elements but also some of the activities that you might be doing. We’ve broken down where and how to buy best travel insurance. TLDR – Check out our review of World Nomads and make sure you’re fully protected, including winter sports.
5 Tips for Cold Weather Travel
We started this article talking about the challenges of travelling in cold weather but what can you do to better prepare yourself for your winter trip?
While you can’t control the temperature, you can make sure you’re prepared for anything. Here are 5 key tips that you’ll be happy to have in your back pocket.
- Get good gloves – The most miserable thing about winter cold weather travel is having frozen fingers. Once they get cold, it’s hard to warm them back up again and if you want to use your phone or camera, they’re even more susceptible. I can’t recommend The Heat Company’s gloves enough. Convertible gloves from mitten to fingers is game-changing. With these gloves, you can get into the habit of never taking off your gloves outdoors.
- Don’t cheap out on hand warmers – Do what we did and buy a box. Use them everyday and open up the package 30 minutes ahead of time to let them fire up.
- Accept the fact that you’ll be re-wearing your layers – Once you get over this, you’ll be able to pack much lighter. Layering is of course super important but you don’t need as many copies or variations of layers other than your underwear and socks. Remember, nobody’s going to be really seeing what you wear underneath so nobody will know or even care. If you have quality breathable, you shouldn’t be sweating much.
- Prepare for the unexpected – Stay flexible and go with the flow of what the weather gives you. If you can, try to build in buffer days and don’t pack too much in your schedule.
- Layers work – Instinctively, you’ll want to buy a heavy Canada Goose expedition jacket but we’re here to tell you that you don’t need to. We’ve preached ad nauseam about the benefits of the layering system but it’s worth the investment because it’ll not only carry you through this trip but its various combinations will work with all four seasons of your future adventures.
Frequently Asked Questions
The short answer is yes. That said, remember that when skiing or snowboarding, you’re constantly active and on the move so you generate a lot more heat which means it is much forgiving. These type of layers can also be quite bulky and heavy. When in extreme cold, you will want more insulation layers.
Cold weather travel is any time you are travelling to a destination that is 0°C (32°F).
That is the beauty of layers. You can always shed layers as needed or unzip to bring in cooler air. Technical gear will often have features like pit zips that will help you dump the heat.
The best winter gloves that give you the flexibility of having maximum insulation in a mitten while also being able to convert to a fingered glove is The Heat Company.
The industry leaders in the space are Patagonia and Arc’teryx which specialize in rugged outdoor gear that can withstand the elements and the performance required for active adventures including climbing, hiking, mountaineering, and snow sports.
The best tip is to not overpack. Go with the expectation that you will wear your core set of layers everyday since you won’t sweat that much so you don’t necessarily need that many copies of the same thing except underwear of course. Lastly, keep everything compact by rolling your clothes and using packing cubes.
A better alternative to a scarf is a neck gaiter and more specifically a Polar BUFF which will give you insulation by your neck while also allowing you to cover your face. This is much more versatile than a scarf.
Sweaters are great for casual situations on your trip but for extreme cold they won’t serve you as well as a quality technical fleece or mid-layer jacket that will wick moisture away, help you retain heat, isn’t clunky, while also giving you better mobility.
A packable down is great for cold weather travel in urban cities where you can throw it overtop a t-shirt but in serious cold temperatures, might not be enough to keep you warm as it doesn’t the necessary insulation and moisture wicking capabilities.
Long underwear or long johns can be made with merino. Strictly speaking, base layers are made to go overtop underwear because otherwise, it may get soiled unnecessarily. That said, let’s just say it has been done before.
What you should read next
Leave a Reply