I’ve received a lot of questions about how I was able to photograph Horseshoe Bend so I wanted to show you how to shoot HDR with your camera to get this kind of effect. It’s a lot easier than you think.
Read more gear reviews
- Best Winter Photography Locations in the Magdalen Islands
- Review of the Best Travel Tripod by Peak Design
- Must-Have Winter Gloves For Photographers
- 10 Tips for Creating Travel Videos
- Kammok Swiftlet Review
- Our Best Photography and Videography Reviews
How to find the best travel deals?
- Hottest deals – Bookmark the frequently updated travel deals page.
- Car rentals – Save the most money through car rental coupon codes.
- Hotels – Use corporate codes or get Genius 2 tier with Booking.
- Flights – Have you ever heard of the “Everywhere” feature?
- Insurance – Make sure you’re covered for all of your adventure activities with the best travel insurance.
In This Article
How to Shoot HDR
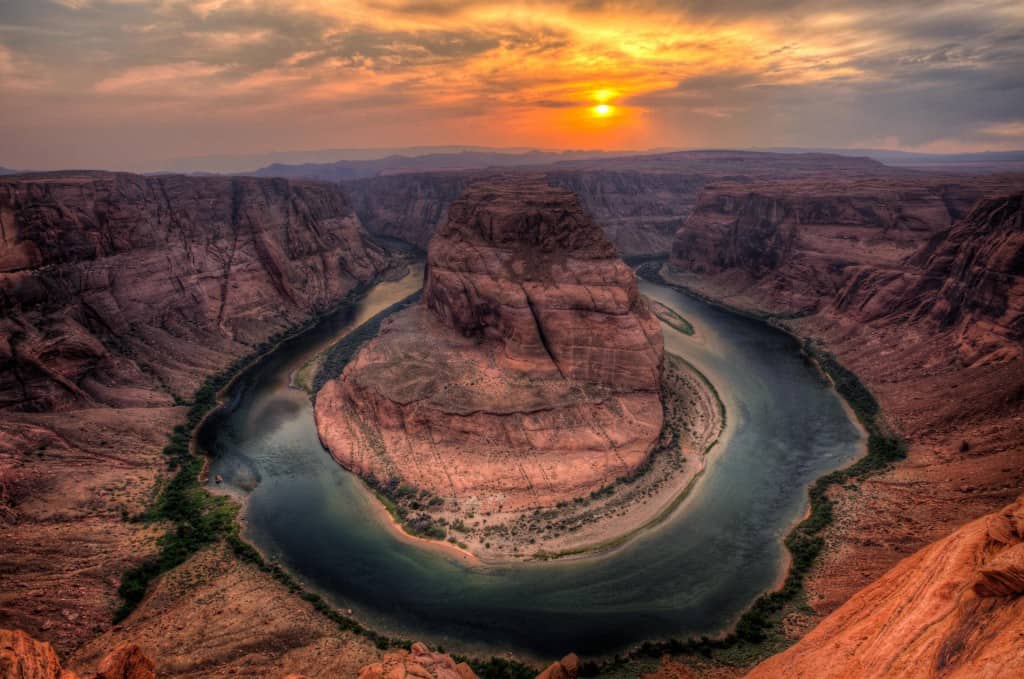
got a lot of questions about how I was able to take this photograph so I thought it’d be cool for me to give you the quick and easy how-to. It’s a lot easier than it looks!
What is HDR?
Before we begin, what exactly is HDR? HDR stands for High Dynamic Range. You can usually easily identify HDR photos because it has a certain color pop that makes it somewhat surreal. Depending on how a photographer post processes the photo, it can be subtle or totally in your face.
My fav bloggers in The Planet D are big fans of HDR and you’ll notice it in most photos they post.

HDR has become a more popular technique as of late. You’ll notice all modern smartphones will have an “HDR” function. My iPhone 5S now automatically detects specific high contrast lighting conditions where it’ll automatically shoot HDR. What I mean by “high contrast lighting conditions” is when you’re in a situation that has something that’s crazy bright and at the same time has extremely dark spots. These are always hard to shoot because either something will be overblown (lose all detail in those bright spots) or underexposed (dark areas remain dark and it just stays black).
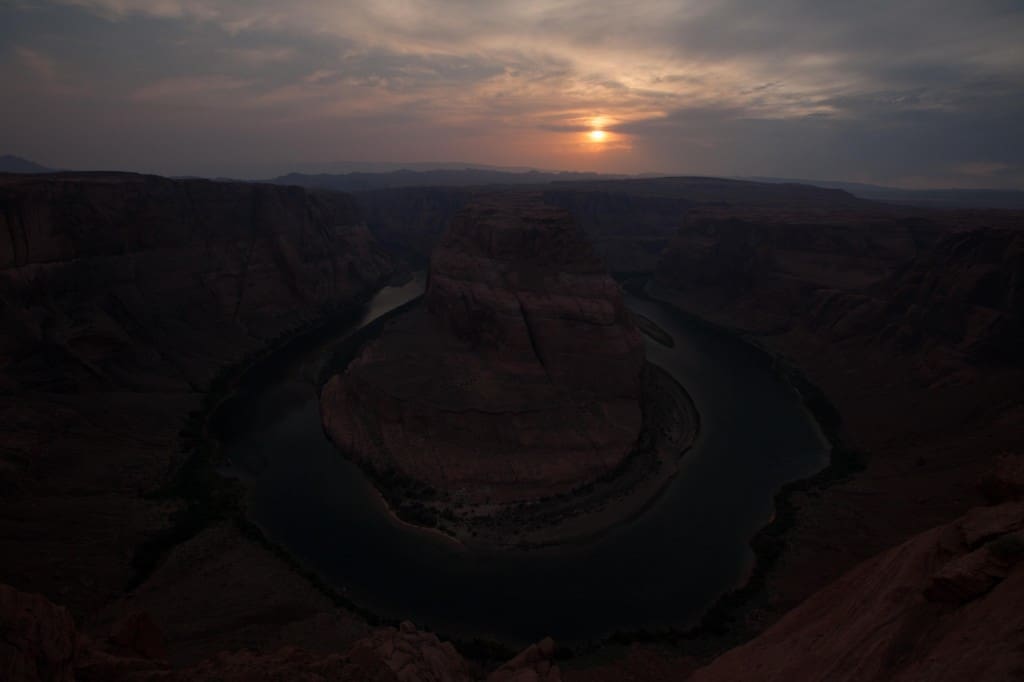
To create an HDR photo, what your phone or your computer will do is take 3 or more sequential shots at different exposures. One will be at perfect exposure so everything in the frame is lit up in a balanced way. The second snap will be at a lower exposure so it is purposely darker. I mentioned earlier that the iPhone will flip to HDR mode because of “high contrast lighting conditions” and so the point of the lower exposure shot is to darken those super bright spots in the photo (i.e. the sky). The third shot is the opposite and everything will be at a brighter exposure. This brings out the detail in the dark (i.e. shadows). The magic comes when you combine all 3 or more photos together and the phone or computer will selectively piece together the best parts of all the photos so that everything looks perfectly exposed.
Okay so this describes one situation where you want to make the best out of a shitty lighting condition but what about those beautiful landscapes? Well outside the practicalities of shooting HDR to create a nicely exposed photo is that when you start combining these you capture all of the “ranges” of the photo from the high and low tones which when combined results in a phenomenon of higher luminosity – that dreamy and vivid look.
The Example
Here are the 3 shots I used to meld into the shot of Horseshoe Bend above from my trip to Utah and Arizona.


Step by Step
The screenshots are biased to Canon since that’s what I use but Nikon and others should be similar.
- What you’ll need: DSLR + widest angle lens you have + tripod + nerves of steel
- When to go: Google “sunset time Page Arizona” and go 1-2 hours beforehand
- Preparation: Make sure you use a lens pen to clean your lens and if you haven’t already, change the time on your camera (my pet peeve)
- Find the spot you want to shoot: Sometimes you’ll be limited by where’s left but I would recommend a spot that doesn’t have jutting rocks below that would cover the river bend and is relatively centered. You can use this photo as a reference
- Set up the camera: Mode = Aperture Priority (A), F-Stop = 8, ISO=100, 3-Shot Bracket Mode (-2,0,+2), RAW (though JPG will work just as fine)
- Okay Bracket Mode sounds complicated but it’s actually not. In Canon systems, you’ll want to navigate to the Exposure Comp./AEB of the red menu

- From there you’ll see this and what you’ll want to do is use your wheel so that instead of one red line at 0, you’ll have 3 lines. One at -2, 0 and +2

- So what exactly does this do? This takes 3 consecutive shots but at 3 different exposures. One really dark (-2), one at the perfect exposure (0) and one really bright (+2)
- Okay Bracket Mode sounds complicated but it’s actually not. In Canon systems, you’ll want to navigate to the Exposure Comp./AEB of the red menu
- Timer mode: You need to turn on the timer mode on your camera

- Set your tripod + camera on the edge: It’s going to be a little scary (at least it was for me) but you’ll pretty much want it as close as the edge as possible so there’s nothing in the foreground blocking your way
- Compose and shoot: The rest is auto-pilot. All you have to do is click the shutter button, the timer will count down and it’ll take 3 continuous shots just like that. Keep doing this as the sun sets as the scene will dramatically change for the next 1-2 hours
- Post-processing: Oh I know…stop groaning. Yes there’s still a bit of work to be done but you’ll be amazed by how easy it is. Just download a piece of software called Photomatix (Mac or PC) and it should be pretty self explanatory from there. It’ll ask you to pick a set of photos (these ones you just took) and it’ll combine them for you. From there, pick the style you want that you like the most and “Process” it. Boom. Done!


When to use HDR
- Landscapes – Especially great during sunrise and sunsets
- Sunlight in the background – Big bright skies always cause problems and as a result your photos will be underexposed (too dark) in the foreground. Use HDR to balance it out
- Low light with back light – Shots where shadows as casted and you need HDR to really bring out those shadows while controlling the back light.
When not to use HDR
- When you don’t have a tripod – The only way HDR works is if you have a tripod or extremely steady hands because those 3 sequential shots need to be identically composed
- When there is lots of movement – So even if you have a tripod, if your scene has a lot of people moving, you’ll get a lot of blurry artifacts (unless that’s what you’re looking for)
- The scene is already well balanced lighting wise – Don’t always just default to HDR all the time. It wastes memory and gives you a lot of post processing work after. If the scene you want to shoot already has balanced lighting and you don’t need that dreamy/vivid look, you can simply just take one well exposed shot. If you want a bit more pop, you can easily post process the photo in something like Lightroom and just adjust the contrast, clarity, vibrance and situation to your personal tastes. Simply put, don’t overcomplicate thing when you don’t need to.
What you should read next
