The aurora borealis is something that we’re all chasing after when we think about Iceland. It’s the northern dream so to speak. It waves, it dances, and it glows.
Thing is, it glows a lot less than you picture in your mind. All the photos you see out there show the northern lights as this wildly vivid green that mystically glows in the sky. I’m here to tell you that in person (and hopefully I don’t break anyone’s dreams here) that to the naked eye, the northern lights look more like patches or scattered clouds of light. It may even look like a cloud but through the lens of a camera, you get to see the truth behind those quickly dancing clouds.
So how do you photograph the northern lights? It’s a question I had to research before I went on our 8 day trip to Iceland. It sounds complicated but the truth is, as long as you have the right gear and the right set up, all you literally need to do is snap the shot.
Read more about Iceland
- Guide to renting a car in Iceland (discount codes inside!)
- 8 day Iceland itinerary
- Top 5 hotels in Rekyjavik on a budget
- 12 best things to do in Iceland
- Reasons to go to Iceland
Our favourite stay in Iceland?
- Of all the places we stayed, we really appreciated the ability to check-in early at the Hilton Iceland Nordica. They totally weren’t obligated to allow us to check-in early in the morning after our early flight into Iceland but they did and boy was it nice to shower and freshen up before starting Day 1.
In This Article
When To Catch The Northern Lights
First things first though, it’s not everyday that you can see the northern lights in Iceland. Specific conditions have to be met for the show to even begin:
- There needs to be no clouds – This makes sense because if there are clouds, it covers up the activity that’s in the sky
- It has to be dark – This rules out summer where you get midnight sun. This is why the winter season is the best time to see the lights because it’s dark for most of the day
- You need to get away from light pollution – Get out of the city and into the wilderness. The darker it is, the more clearly you’ll be able to see the northern lights.
Gear You Need
Next, you’ll want the right gear to capture the moment. The central theme around this is that you need to stabilize your shot. Here are some high level recommendations:
- Tripod – This is a must. Whether it’s something simple like a Gorilla Pod or a good carbon fibre tripod like my Sirui, this will keep your camera still while it is taking that long exposure shot
- Advanced camera – For any serious photos of the northern lights, you’ll want an advanced-class camera (I’m not sure what else to call it). Whether it’s a DSLR or a mirrorless camera, you’re looking for one that has a full M (manual) mode
- Going wide – The sky is huge and you want to have as wide of a lens as possible. In DSLR speak, that means something like the Canon 16-35mm. In micro four thirds speak, that’s the Olympus 7-14mm. In my case, I got my hands on an 8mm fisheye lens that worked beautifully.
- Warm clothing – It’s going to be cold out there so bundle up! This includes gloves because your fingers are going to freeze up first
- Batteries – With the cold, it means that your batteries are going to die very quickly. Make sure you have a bunch of extra batteries ready to go and even better would be to have those batteries in a warm place or use a heat pack to keep them warm.
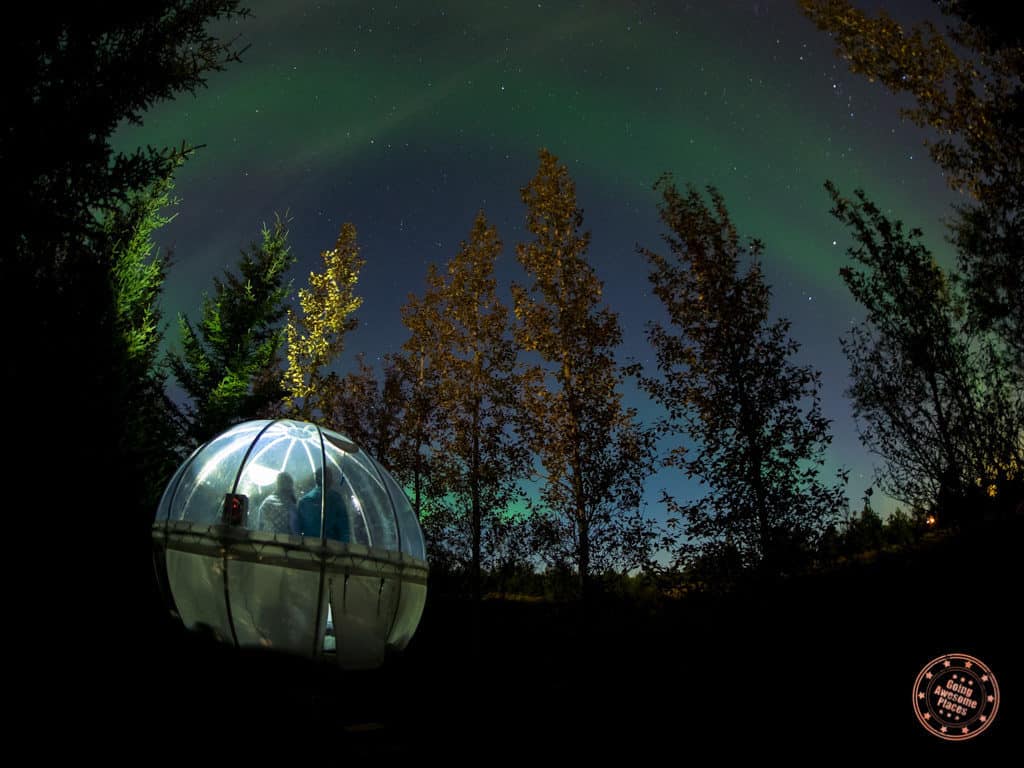
- Headlamp – If you look at those photos of the Bubble hotel, you’ll see that it’s lit up pretty well. I was able to do this by pointing my headlamp up. Also helpful if you get lost in the dark ;)
Most Popular Car Rental Company in Iceland
Blue Car Iceland is the most reputable brand in Iceland and we would definitely rent from them again. Book through our special link below to save 5% on your rental.
Step By Step To Photograph The Northern Lights
1. Look at the Sky
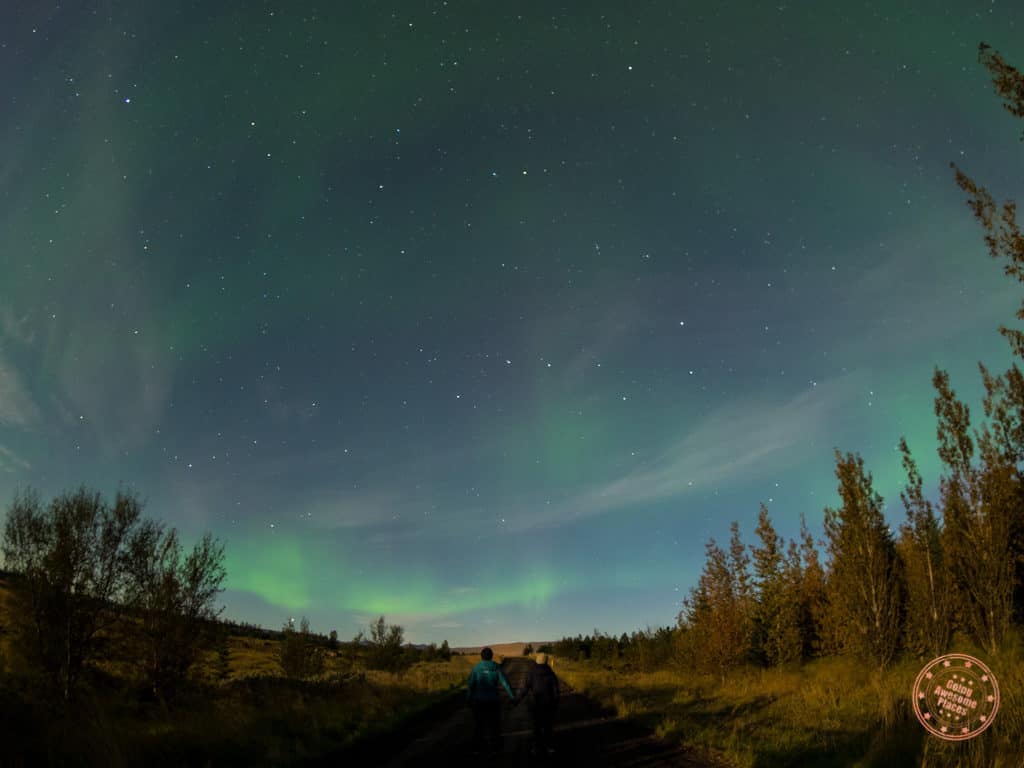
The first step is to locate the northern lights. It may be too early or the conditions may not be right but if you’re lucky, you’ll see clouds in the sky that resemble bright steamers, arcs, shooting beams, or rippling curtains. They’ll look like wisps of grey coloured cloud but abnormally brighter and morphing.
2. Compose
Once you’ve found out, put yourself in a position where you’d like to shoot the northern lights. The key to a good shot is that you have something interesting in the foreground to balance the northern lights. It could be a road, trees, mountain, cliffs, or in my case a Bubble hotel, to set some context around where you are instead of just shooting the lights.
This is going to be more of an experimentation than anything else and will depend on what you have to work with. For me, the Bubble hotel was perfect but as well so was the road that led into the farm. Since you’re on a tripod, you could put yourself in the shot too if you stay still. Have fun with this!
When you’re in position, set up your tripod and mount your camera on it. Having a tripod with a proper ball head does help since it’ll give you a lot of freedom of movement.

Read next: Don’t forget these Icelandic souvenirs before you head home.
3. Camera Settings
This is perhaps the most important part. There are a few fundamentals here that you should understand.
Timing: The longer you expose the shot, the more light comes in which is critical when there’s not a whole lot of it in the night. This has to be balanced with the fact that the longer you expose a shot, the higher chances you’ll start picking up artifacts and overall graininess. The other thing to think about is the fact that the northern lights are moving quite quickly. So if you set your exposure TOO long, you’ll end up getting a big blur instead of capturing it more of an instantaneous form.
Stillness: Because the photo is being exposed for so long, the camera needs to be as still as possible or else it’s going to come out blurry. You won’t have too much control though of things like waving branches if they’re in your shot.
ISO: This is the light-sensitivity of your camera’s sensor. The higher the ISO, the more sensitive but more noisy and grainy. The lower the ISO, the cleaner the image is but longer it’ll take to get the right exposure for your photo. This is a bit of a balancing act because if you lower the ISO, the exposure time is too long.
Aperture: This is the f-stop setting of your camera. In simple terms, the lower the f-stop (i.e. f/2.8), the more the light comes in but the shallower the depth of field. This means that at f/2.8, you’ll get that blurriness effect where your point of focus will be sharp but forward and backwards of your focal point, it’ll blur out quickly. The higher your f-stop (i.e. f/8), the less the light comes in but the deeper the depth of field. This means that you got a photo that is more equally focused backwards and forward of your focal point. This is going to be counterintuitive based on this but for the northern lights, you want to shoot as shallow as possible. This is because with wider apertures (>f/2.8) it becomes hard to focus at night.
Okay so, getting back to my point, what settings should you have your camera at? There’s no exact answer for this but as a starting point, this is what I landed on for most of my photos in Iceland:
Optimal Settings For Northern Lights
- Aperture: f/1.8 (or as you can go)
- Shutter speed: 6 seconds (6″) (recommended to keep this between 5-7 seconds)
- ISO: 1600 (I ended up here but typically you want to be in the 400-1600 range)
4. Focus
This is going to be hard. The problem is, how do you focus on the sky if it’s mostly pitch black outside?
There are two ways about this.
The auto focus method:
- For most people, I’d keep your camera lens set to auto focus.
- Look for something bright in the sky to focus on. The moon is great for this and so are very bright stars.
- Point your camera at this subject and let your auto focus do its thing.
- When it’s done hunting for the right focus, switch the lens to manual focus and do not touch it.
The manual focus method:
- Switch your camera lens to manual focus.
- Look for something bright in the sky.
- Use the manual focus barrel and looking through your viewfinder, adjust your focus until that bright object is in focus.
- Don’t touch the focus at all during your shoot.
The lazy method:
While this may not be the most accurate method of focus, this may be an easy alternative to the above. Your lens should have an indicator of what distance it’s focusing on. Set this to infinity and don’t change anything while you’re shooting.

5. Shoot and Test
The rest is all you. Take a few test shots and take a look at the result. Does it look properly exposed? Is it well focused?
From there, make the appropriate adjustments to the settings and take a few more shots. Keep iterating until you’re happy with the results.
6. Post Process
What really makes the photos come to life is the poset processing. You don’t want to over do it but this is your chance to clean things up, add a bit of punch and increase the pop of the colour.
The best way to show you this is just an example of the settings I use in Lightroom for a northern lights shot I took in Iceland.

Bonus: Capture A Timelapse Video
A lot of modern cameras these days have a time-lapse feature built in these days. My Olympus OM-D E-M1 has this mode and what it does is essentially take a photo every X seconds. The camera or post-processing will stitch together all those photos to make a video.
Time-lapse is what you need because of how long it takes for the lights to evolve and morph in the sky. In an hour,
This is an example of what I shot right as I was leaving for bed. Yes, I literally left my camera on the tripod, set it to take 999 photos and went to bed. I fully expected the camera to die well before then.
Time-Lapse Settings Used
- Frames: 999
- Interval Time: 5 second
- Movie settings: 15 frames per second
Are you headed to Iceland soon? The full details of this trip and everything I learned can be found in the 8 day itinerary.
What you should read next
Travel Resources For Your Next Trip
If you’re in the process of planning your trip and putting together your itinerary, these are genuinely the best resources that the Going Awesome Places team stands by 100%.
Credit cards: Don’t get burned by hidden fees on top of terrible exchange rates. When we travel now, we use the Wise Card. Simply load it with the currency you need before you go and use it as a regular VISA or their digital wallet card. Use their free app to track how much you have and top up when you need to.
Flights: Of all the booking search engines, Skyscanner is the most helpful and easy to use thanks to their Everywhere feature. Kayak is also another that’s we will often check as well.
Car Rental: If you’re looking to save money, these car rental coupon codes will be a true game-changer. Otherwise, DiscoverCars and RentalCars are great places to start.

Airport Parking: You’ll need a spot to leave your car at the airport so why not book a spot at a discount. Use code AWESOME7 to get at least $5 off at Airport Parking Reservations or Park Sleep Fly packages.
Data: We’ve been a huge fan of wifi hotspot devices like PokeFi because their rates are so good and you can use it globally but recently, we’ve really loved using eSIMs. The best one is Airalo. Save money by getting region-specific eSIMs and use referral code WILLIA9500 to get $3 USD credit on your first purchase. Ubigi is another one that we’ve had success with where they uniquely offer 5G coverage. Use code AWESOME10 to save 10% on your first order.
Hotels: Our go-to is Booking.com because they have the best inventory of properties including hotels and B&Bs plus they have their Genius tier discounts. The exception is Asia where Agoda always has the best prices. TripAdvisor is also useful for reviews and bookings.
Vacation Rentals: Your first instinct will be to check Airbnb but we always recommend checking VRBO as well if you’re looking for a vacation rental.
Tours: When planning our trips, we always check both Viator and GetYourGuide to at least see what’s out there in the destination that we’re going to. They often have different offerings and prices so check both.
Travel Insurance: Learn how to buy the best travel insurance for you. This isn’t something you want to travel without.
- Insured Nomads – Popular insurance provider for frequent travelers and comes with great coverage and special perks.
- RATESDOTCA – Search engine Canadians looking for the cheapest insurance including multi-trip annual policies.
- SafetyWing – A perfect fit for long-term nomads.
- Medjet – Global air medical transportation.
- InsureMyTrip – Best for seniors, families, and those with pre-existing conditions.
If you need more help planning your trip, make sure to check out our Travel Toolbox where we highlight all of the gear, resources, and tools we use when traveling.
