The darling of New Zealand and the not-so-secret better of the two islands is the South Island. It’s massive. It’s dramatic. It’s wild. It’s the adventure capital. It’s epic. While I still say the top things to do in the North Island rival the South, it’s almost unfair when you factor in the sweeping mountains, towering fjords, and carpets of glaciers.
With an opportunity to spend 3 weeks in New Zealand that combined both independent an road trip and group touring with Flying Kiwi, I marvelled at just how incredibly easy it was to fall in love with the country all over again despite it being my second time to New Zealand. It’s a country that tempts you to get up close and your hands a little dirty as well. Here are my top favourite places and activities that everyone should have on their bucket list when planning a trip to NZ.
It’s hard not to have your breath taken away in the South Island
Read more about New Zealand
- The must do things in the North Island
- What to pack for a trip to New Zealand
- The ultimate NZ Travel guide
- Where to stay in New Zealand with Hilton
Where to stay in South Island
- It’s a vast island but if I were to choose, our favourite accommodations in the South Island were definitely our Closeburn B&B in Queenstown, and the Punakaiki Beach Camp for it’s close proximity to the Pancake Rocks.
Things to do in the New Zealand’s South Island
These are the top things to do in the New Zealand South Island that you can’t miss. I’m still dreaming about the day that I get to go back.
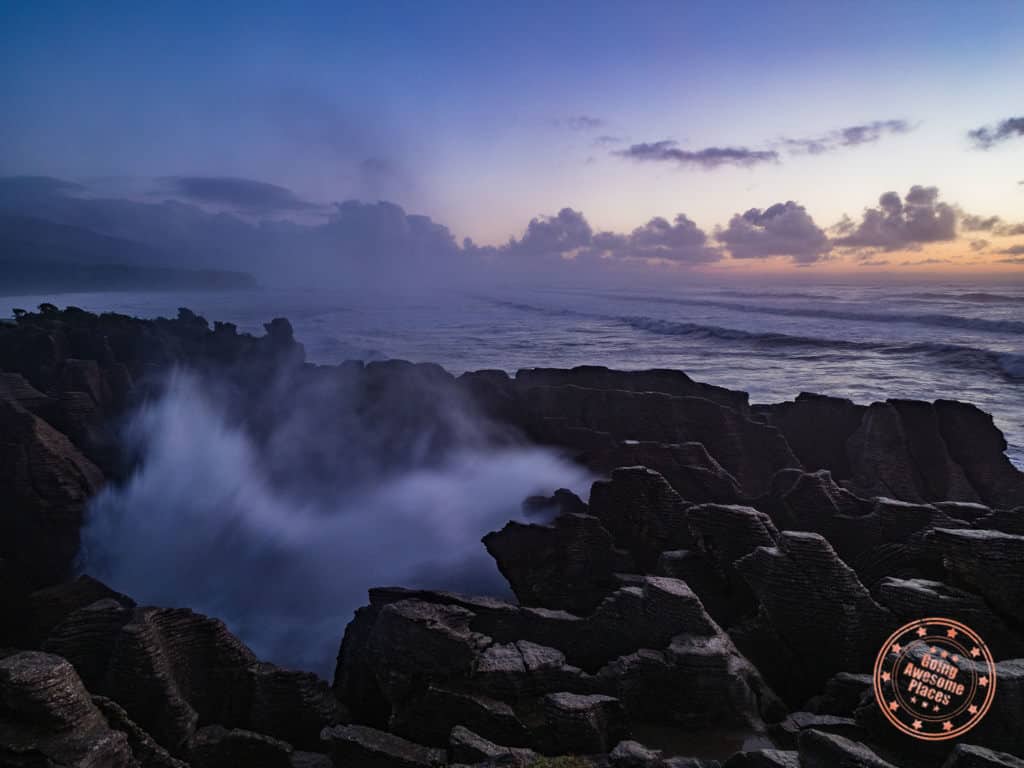
#1 – Pancake Rocks
This was one of the big surprises for me coming to New Zealand and that may have been because being on Flying Kiwi’s Reverse Traverse allowed me to be a bit lazy when it came to planning.
The Pancake Rocks and Blowholes is an extremely unique geological formation that was created from the bashing and thunderous battering of the Tasman Sea but even then that barely explains the layers of limestone that form these thin layered columns as if a thick comb brushed through it at one point.
As the tide rises, so too does the intensity of the water that surges up the small openings found here, creating a huge wall of spray.
Beyond the pancakes themselves, you’ll also found a ton of other incredible rock bridge formations and chimney blowholes that also create a mist of fun that makes this 20-45 minutes walk a highlight for any trip to the South Island.
WHAT YOU NEED TO KNOW
Address: 4294 Coast Road, Punakaiki, RD 1, Runanga 7873 (Paparoa National Park Visitor Centre)
Hours and best time to go: Always open. The blowholes and splashing of water becomes most evident at sunset when high tide comes in. Going any other time will not be very dramatic so plan your time around this
Price: Free
Parking: Plenty of free parking spots near the entrance and visitor centre across the street
Hiking length and difficulty: 1.1km, easy, 20 minutes to do the full loop
Photography: A tripod is mandatory and also prepare for a lot of mist splashing your lens so have a number of dry clothes available to keep things dry and a towel as a cover in between shots
FAQ:
- Are drones allowed? No. There’s an explicit sign that makes it clear no drones are allowed
#2 – Shotover Jet

Their moniker is “the world’s most exciting jet boat ride” and having done this experience twice, they’ve certainly cemented themselves in that place.
It is honestly hard to describe as there’s really nothing really like it elsewhere in the world because not only is it an insanely fast boat, you’re also zigging and zagging through narrow canyon rock walls that look like they could immediately bash you in but the pilot so skillfully glides along the water like a choreographed dance.
What’ll surprise you is that it’s a decently lengthy ride that isn’t just a ride out to the canyon and back so there’s a ton of time to savour every inch of the adrenaline rush.
WHAT YOU NEED TO KNOW
Address: 3 Arthurs Point Rd, Arthurs Point 9371, New Zealand
Hours: This varies by season but they depart every 15 minutes and operate every day (weather and river conditions permitting) except Christmas day. Typical slots are available from 9AM – 3:30PM.
Getting here: There are two options
- Drive – Shotover Jet is located at Arthurs Point, 7km from Queenstown. Parking is free.
- Shuttle – Complimentary shuttle transfers depart from ‘The Station’ Information Centre, corner Shotover and Camp Streets, in downtown Queenstown up to every 15 minutes. Account for 1.5 hours round trip for the shuttle. No reservation needed ahead of time.
Price:
- Individual – NZ$155 Adult NZ$89 Child (5-15)
- Family (2 adult, 2 children) NZ$399
- Family (2 adult, 1 children) NZ$354.50
- Photo packages with video cost NZ$59.99
- Photo only for NZ$39.99
- USB photopack NZ$79.90
What’s included:
- Lifejacket and waterproof jacket
What to bring:
- Sunglasses or general eyewear strongly recommended because of the high winds
- Warm clothes, jacket, hat and gloves are strongly recommended in winter
- The only type of camera that’s allowed on the boat are those that are on a head mount so if you plan on filming, make sure you have something like the GoPro headmount and GoPro Fusion (pretty rad 360 spinning footage you see in the video). Nothing handheld is allowed.
Tips:
- If you’re looking to save money, book the first ride of the day which they call “Sunrise Jet” to save NZ$20. The time varies throughout the year but its usually between 8:15AM and 9AM.
FAQ:
- There’s a minimum height restriction – must be a minimum height of 1 meter tall and must be accompanied by adult. This could rise up to 1.2m if the water conditions are rougher.
- The check-in area by the river has lockers for your time slot so you can store your bags there.
- The jetboat ride is roughly 25 minutes.
- Check-in for your ride is available 30 minutes before.
- There is free wifi in the Shotover Jet information centre.
#3 – Franz Josef Glacier

You probably didn’t know this but New Zealand has not one but two of the most easily accessible glaciers in the world – Franz Josef and Fox Glacier are both along the western coast of the South Island and present one of the most memorable activities you can do in New Zealand.
It’s rare that in a day you can say that you took a helicopter, landed on top of a glacier, slipped on crampons, and got to hike through crevasses and climb up chiseled out staircases. This is a guided experience that takes you deep into an ever-changing icescape. It’s a marvel of sight to be up on this huge mound of slow moving ice.
The only other place I’ve been able to do something like this was part of a 8 day itinerary in Iceland but Franz Josef for me will always be etched as my first and one that is a must-do if you’re exploring this part of the country.
Franz Josef is where I had my glacier hiking experience but you’re probably wondering what the difference is with Fox Glacier. Both are very similar in my opinion and located virtually in the same area since the two glaciers are in neighbouring valleys. In terms of experience, both are world-class and the hiking will be of the same variety but of course, the landscape will be very different based on the conditions and movement of ice. Technically, Franz Josef is steeper than Fox Glacier but Fox Glacier is larger and 2km longer. I’ve read that the Franz Josef experience is a bit more hands-on and the route is pre-cut while Fox Glacier can sometimes offer smaller groups and more surprises as the routes are decided by the guides once up at the top.
Where I feel like Franz Josef has the advantage is that afterwards, you can wrap up your experience by dipping into the Franz Josef hot pools which are adjacent to the main office. This is the perfect companion to the hike to relax those tense muscles and get ready for the next part of your journey. The Franz Josef town is also more developed than at Fox Glacier.
WHAT YOU NEED TO KNOW
The following are the specific information for Franz Josef Glacier heli-hike but if you want to know more, take a look at Fox Glacier as well.
Address: 63 Cron Street, Franz Josef, New Zealand
Hours: Departures are all in the morning from 8AM to 11:50AM with total duration up to 4.5 hours and 3 hours on the ice.
More info: Website
Price: NZ$499 for adults and children during peak (October – March) and NZ$479 (April – September)
What’s included:
- Crampons
- Suitable walking boots and socks
- Trekking poles
- Waterproof jackets
- Waterproof over-pants
- A small waist pack to carry your crampons and essentials
- A warm hat and gloves
What to bring:
- Dress in multiple layers
- Hiking pants (jeans not recommended)
- Sunglasses
- Sunscreen
- Hat and gloves (instead of using theirs)
- Camera/phone – There’s limited space on the helicopter so they don’t allow backpacks. This means that everything you bring must fit in the fanny pack they provide
- Small water bottle and snacks (no food provided)
FAQ:
- What aren’t you allowed to bring? You’re not allowed to bring backpacks, iPads or selfie sticks
- Can I bring my bigger camera (non point and shoot)? The answer is yes but double check with your guide before going. Since your big camera probably won’t fit in the fanny pack, you’ll need to make sure you have your own neck strap
- Is there a bathroom on the glacier? No, when we asked that question, the answer was that basically we would have to hold it in. Guides do have an emergency “poop bag” as we called it but you really don’t want to be using that and making your guide carry it all the way back so I advise you clear everything you can before heading up
Book with Flying Kiwi

If you’re looking for an incredible experience around New Zealand without the stress of planning it all out yourself, the chance to travel with amazing people, and explore New Zealand the way it was meant to be seen – the outdoors with a ton of adventure, check them out!
Use the Flying Kiwi promo code “GOINGAWESOMEPLACES” to get a free sleeping bag rental (valued at NZ$60) for your entire trip!
#4 – Visit A Kiwi Bird Centre

You see kiwi birds as stuffed animals, on key chains, paper weights, postcards, and stickers but you’ll never see them in real life unless you do one of two things. You can go on a night time safari out into one of the few habitats where they can still be naturally found such as near Okarito or you can go to one of many kiwi centres.
You’d think the national bird of New Zealand would be everywhere but they are in fact endangered in the wild because of introduced predators such as the stout and possum. To start, there aren’t that many of them and on top of that they’re nocturnal creatures so you won’t see them wandering around during the day. As a result, the only real guaranteed way to spot them are in places that recreate their habitat.
The biggest reason why it’s worth it to see a kiwi in person is because you really know what they look like and how they move until you’ve seen them with your own eyes. I can only describe them as these basketball sized birds that have stubby legs with a straw for a beak. The one particular one we saw here was recently introduced to the space and so was running wildly from one pane of glass to another and drawing semi-circles with his/her beak as a way to mark their territory. It was quite fascinating to watch. Their basketball torso is also incredibly cute.
While I wish I could’ve taken a photo, no cameras are actually allowed in the kiwi sanctuary and even if I could, the photos would turn out terribly because it’s in near darkness inside. It makes sense that cameras aren’t allowed because they know people will accidentally trigger their flash.
Centre such as the National Kiwi Centre in Hokitika are incredibly family friendly and can be explored at your own pace. Other animals you’ll find here are the giant longfin eels and the native reptile called tuatara that were considered extinct until rediscovered in 2005.
WHAT YOU NEED TO KNOW
The particular kiwi centre we went to was located in Hokitika but it seemed like you could find one of these in many towns in the South Island.
Address: 64 Tancred St, Hokitika 7810, New Zealand
Hours: 9AM – 5PM (9:30AM – 4:30PM during winter)
Price: Adult NZ$26, Child NZ$15, Senior and Student NZ$22
Parking: Street parking is available in Hokitika
Tips:
- If you’d like to see eel or kiwi feeding, plan to be here at either 10AM, 12PM or 3PM
- No need to book tickets in advance. Purchase tickets at the entrance
#5 – Skydiving above the Abel Tasman

If there’s one place to go skydiving in New Zealand, I’d say it would have to be at the north part of the South Island where you can catch glimpses of the North Island, can see how the coast wraps up towards Nelson and Picton, the mountains, river outlets, and famous Abel Tasman National Park. You can see it all from 16,500, 13,000, or 9,000 feet.
I share my full experiences from our 13,000 feet skydive with Skydive Abel Tasman and after you read it, you’ll understand why it was such an incredible experience and even as someone that’s afraid of heights, why I’d totally do it all over again.
WHAT YOU NEED TO KNOW
Address: 16 College St, Motueka 7120, New Zealand
Hours: There are slots between 7AM and 4PM but that may change depending on season
Price:
- Jump
- 9,000 – NZ$279
- 13,000 – NZ$329
- 16,500 – NZ$419
- Photo/Video (everything is loaded onto a USB key, video is curated and assembled)
-
Outside Cameraman with HD video and 80 stills – NZ$259
-
Tandem Master Handcam video and stills – NZ$189
-
Combination of the above – NZ$309
-
What to bring:
- Comfortable loose clothing and shoes that won’t fall off – they provide the rest including goggles, cap, and one-piece windsuit
Tips:
- You can request a free shuttle for anywhere in Nelson through to Kaiteriteri and Marahau if you don’t have a car
- There’s a huge parking lot of the skydive centre and this is free
- Go to the bathroom right before suiting up
- No need to arrive early – just show up at your booking time
FAQ:
- Can I bring my own GoPro? – I would have loved to have used my GoPro Fusion but as you can appreciate, no personal recording devices are allowed because they want you to focus on the experience
- Where can I change? I’d recommend putting your swim wear on in the car or at your hotel/B&B ahead of time. When you come out of the beach, there’s a new change room facility which is well maintained and clean
- Do I need an oxygen mask? This is only required for those doing a skydive at 16,500 feet. In talking to other people that did this, it’s not a big deal at all. They give you a mask to wear as you ascend in the plane and it comes off right before jumping
- Should I book in advance? Yes! This is a popular activity and if you want to get a specific time slot to fit your itinerary, I recommend booking in advance
- Is there somewhere I can store my things? There cubby boxes and lockers available so your things are nice and secure
- How many go up with you on the plane? In terms of customers, this is a question of weight balance. Depending on the weight of the skydivers, and need for extra cameraman, there could be up to 5 or less
- Is there a weight limit? Yes, it’s 100kgs / 220lbs for every tandem passenger
- Is there that rollercoaster drop feeling? I’m afraid of heights and honestly there wasn’t anything scary at all. I barely feel that drop at all and once you’re in free fall, it’s not like bungee jumping where you see the earth coming right up at you really fast. You can’t perceive how fast you’re falling so it just feels like you’re floating in the air with a lot of wind coming at you.
- This or bungee jumping? One big key difference between skydiving and bungee jumping is that someone else is pushing you out of the plane whereas in bungee jumping, you have to will yourself off the platform
- What video package should I pick? Personally I feel like either the outside cameraman or the combo package are the best options to choose. With just the tandem master camera, you have to realize that this is just a camera on their wrist so it’s very much a first-person perspective. With the separate skydiver following you around, you get way more epic footage. If you want it all, just go all out and get the combo
#6 – Milford Sound

Another reason why the South Island of New Zealand is so intriguing is because you have such a dynamic range of landscapes. This being the final frontier of the island, windy roads through Fjordland National Park carved thousands of years ago by ice now opens up to the world-famous Milford Sound.
The best way to see the whole fjord is to get on a cruise which takes you out from the cruise terminal to where the passageway opens out into the Tasman Sea. Along the way, you’ll see thunderous waterfalls, the iconic Mitre Peak, towering mountains on both sides, and wildlife as well. To complete the experience, the Southern Discoveries cruise & kayak is one I recommend because you then get to combine an experience at the Discovery Centre to see black coral up-close in their underwater observatory and then hit the water via kayak which gives you further appreciation of the scale of what’s around you.
This is top activity in Queenstown that you can add to your itinerary.

WHAT YOU NEED TO KNOW
Address: Milford Sound Wharf Visitor Centre, Milford Sound Hwy, Milford Sound 9679, New Zealand
Hours: The hours vary but here are some of the slots that are available: 8AM, 9AM 9:45AM, 10:30AM, 11:30AM, 1PM. The whole Cruise and Kayak experience takes 4 hours.
Getting here:
- This is a 5 hour drive from Queenstown and over 2 hours from Te Anau
- If you are driving yourself, make sure to account for extra time because there are always slowdowns at Homer Tunnel so don’t believe what Google Maps tells you. Locals told us that it’s normally really bad from 11AM – 1PM
- If driving, make sure to do a full fill up in Te Anau as there aren’t any reliable gas stations afterwards. You really don’t want to use this terrible gas station in Milford Sound which is a really long story
- There are tour options that include full transportation from Queenstown so if you’re looking to do this as a day trip, that is possible
- There’s free parking in the lot right by the Cruise terminal
Price: Starts at NZ$169 Adult, NZ$99 Child. Can upgrade to buffet lunch for NZ$15
What’s included:
- One meal is included (Breakfast buffet, picnic lunch, or upgraded buffet lunch
- Access to the Discovery Centre and the underwater observatory
- 1 hour kayaking in Harrison Cove (highly weather/water conditions dependent)
- Waterproof pants, jacket, and dry bag included
What to bring:
- Backpacks are allowed on the boat so feel free to bring any gear you’d like
- It gets window on the exterior of the boat (i.e. top deck) so make sure you have warm clothes
- Kayaking wise, they list “change of clothes” on their list but it’s not really necessary unless you fall into the water which is highly unlikely
- Phones and cameras are allowed as they provide a dry bag but only one camera device is recommended
Tips:
- On top of being cheaper, the first cruise has incredible morning light for photos and includes a breakfast buffet as well which is not advertised
- The last place to get fuel is in Te Anau, so make sure you have enough to get you there – the trip is 242 km (150 miles) return from Te Anau
- There is no change room for kayaking but you can use the bathroom in the Discovery Centre
- Get all your gear ready for kayaking while at the Discovery Centre because once they bring you over to the kayak building, they’ll want you to get into the kayak pretty swiftly
- For the breakfast buffet, the food doesn’t stay the whole cruise so make sure you grab food and try to eat it before the boat departs because you’ll want to be on the top deck for the beginning of the cruise which is the most scenic
FAQ:
- Kayaking is beginner friendly
- Double kayaks are available
- Children under 14 years have to kayak with an Adult in a double kayak
- Fully guided
#7 – Wineries of Marlborough

There are 6 distinct wine regions in New Zealand but perhaps one of the most well known is Marlborough. Not going to this region if you’re a wine-lover is like going to California and not visiting Napa.
Hemmed between the mountain and the sea, the northeast part of the South Island is geologically perfect for the sauvignon blanc but you’ll also find excellent pinot noir, riesling, and chardonnay.
There are of course quite a number of wineries in the region but if you’re looking for somewhere that has excellent wine and offers affordable tastings and snacks, I’d recommend Saint Clair which I personally visited as part of the Flying Kiwi Reverse Traverse. They also have an excellent lunch and dinner menu to pair with their wines.
WHAT YOU NEED TO KNOW
Address: 13 Selmes Road, RD3, Rapaura, Blenheim 7273, New Zealand
Hours: 7 days a week from 9AM – 5PM, Winter (May to October) 11AM – 4PM
Price: Tasting costs are the following
- 3 wines for $5.00
- 6 wines for $8.00
- 8 wines for $10.00
FAQ:
- Do you need to book in advance? – No, drop in is usually fine for this winery
#8 – Abel Tasman National Park

This is a loaded one because the National Park is massive and there are so many ways to explore the whole park. What makes Abel Tasman unique is that it’s the only place in New Zealand with a coastline that consists of what’s called separation granite which is a big part of the park’s popular golden beaches, sculptured granite cliffs and coastal track.
To take advantage of a little bit of everything, I recommend doing Marahau Sea Kayak’s Ocean & Earth which is a 2 day experience that starts with a boat cruise up to Onetatehui where you get geared up with your tandem kayaks and spend the day heading down to Anchorage. You’ll stay the night camping at Anchorage and the next day you’ll do the most popular part of the Abel Tasman coastal track.
To me, what will stick out as memorable about the Abel Tasman is the unique experience we had both on the water and on land. On the water, you have the freedom of kayaking to explore the granite walls, the seal colony that’s part of the Tonga Island Marine Reserve, and the bays that would reveal itself as you kayaked deeper in. On land, the track snakes through the coastline that features a thick forest that’s filled with birdlife, open views of the water, side trails, and secret beaches.
If you don’t have two days to spare, there are a number of day trips that offer kayaking, cruising, and hiking in the Abel Tasman like this one.
WHAT YOU NEED TO KNOW
This is specifically for the Ocean & Earth activity with Marahau Sea Kayaks
Address: MSK Base, 229 Sandy Bay-Marahau Rd, Marahau 7197, New Zealand
Hours: Check-in at 8:15AM
Price: NZ$260 per person. Boxed lunch included.
Shuttle service: If your accommodations are in Marahau, there’s a complimentary shuttle service available
What to bring: Since we were travelling with Flying Kiwi, we could borrow camping gear from the bus for this 2-day excursion
- Sleeping bags
- Tent
- Sleeping pad
- Cooking gear (butane tank, burner, dry food) – You can skip this if you’re preparing your own food ahead of time to eat that doesn’t require cooking
- Change of clothes
- Toiletries
- Waterproof phone pouch – Handy to take photos while kayaking
Tips:
- Make sure they purchase the right campsite reservation (DOC camp pass) for you as there’s a different one between international travellers and locals. The camp rangers are very diligent in checking documentation at Anchorage so make sure you have the papers and also double check with MSK to make sure they’re for international guests
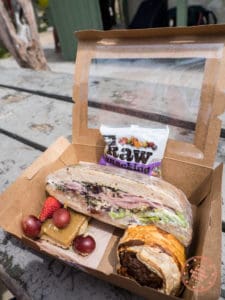
- The boxed lunch is excellent and includes way more food than you need but is packed with a giant sandwich, fruits, ginger bar, a sausage roll, and trail mix.
FAQ:
- How should I pack? – This was probably the part that wasn’t clear with MSK but here’s how it works. You want to have all of your kayak gear ready to have on hand. They’ll have a water proof bag where you can stuff things in like your camera. Everything else will be put in this giant stuff sack on the water taxi. This will get dropped off at Anchorage later on that afternoon so it is there for you when you arrive there. This will contain your hiking backpack and camping gear. The next morning, you’ll fill that stuff sack back up with everything you don’t need for your hike and put it back on the beach for pick up. A water taxi will bring it back to MSK base for when you finish on day 2.
- Can I bring a bigger camera for kayaking? Yes you can and I did. I put this in the waterproof bag and only when we stopped did I get a chance to pull it out for a few quick shots. Otherwise it was in the kayak compartment most of the time. That’s why I ended up using my phone more.
- What are the facilities like? Don’t expect to shower here. There are bathroom facilities so we just washed our face and brushed our teeth for the night. There’s also a kitchen area that is shared with everyone that we used to cook dinner. The most useful part here was that they had a sink to rinse things out and garbage bins.
#9 – Arthur’s Pass

Arthur’s Pass is a bit of a confusing name because it can mean a lot of things. There’s the Arthur’s Pass village which then sits inside the Arthur’s Pass National Park but for most Arthur’s Pass is often referred to as the drive that cuts through the park on Highway 73. To me, it’s the drive and what you can see along the way that makes up the whole experience.
This has to be one of the best drives in the South Island if not the whole country and it’s one that takes you from Kamara Junction or Greymouth on the west to Christchurch on the east. In the middle of that is the Arthur’s Pass National Park and the mountainous terrain presents a lot to look and reasons to stop as you’re passing by giant waterfalls, deeply gorged rivers, creative viaducts, bridges, and rock sheltres to get through the Southern Alps, and dense rainforest.
At every turn, there’s something to look at on this drive which makes it the best drives in New Zealand. Make sure to stop at the Otira Gorge that you see above, Devil’s Punchbowl Falls, and Arthur’s Pass village which is the country’s highest settlement. Also pay attention to the birds that you might see here. It will most likely be the inquisitive alpine parrot, the kea.
WHAT YOU NEED TO KNOW
Directions: Take State Highway 73 which is the main road between Greymouth and Christchurch in the South Island
Duration: The drive from Greymouth to Christchurch is 3.5 hours
#10 – Horseback Riding in Glenorchy and Paradise
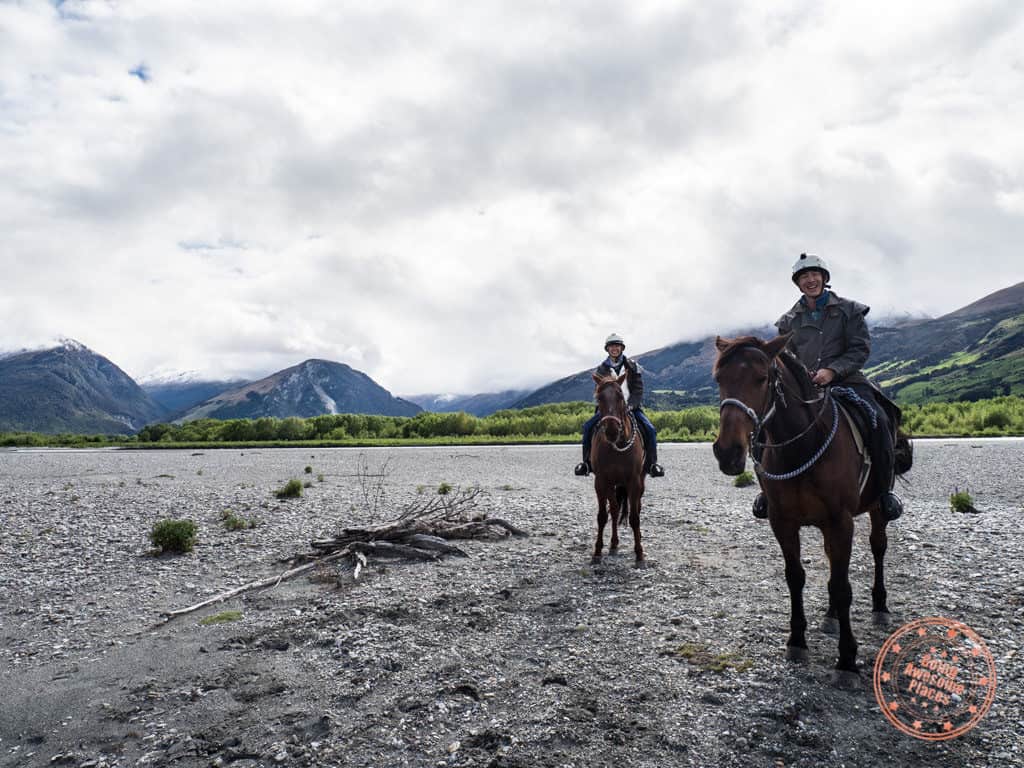
The hidden jewel of the South Island I think is in a pocket not too far from Queenstown known as Glenorchy and a place aptly named Paradise. If you do your research and read the Location Guidebook for Lord of the Rings, you’ll know that Peter Jackson used this area quite a number of times for both the LOTR and The Hobbit trilogies. It’s a place that features the mountains, wide shingle-filled riverbeds, and lush green ent-like forests.
The best way to see all of it is by horseback and that’s where activities such as Dart River Adventures’ River Wild is an excellent choice to do something a little bit more unexpected in New Zealand. If that doesn’t suit your fancy, there is an awesome 4WD Lord of the Rings Tour that guides you into all of spots used in the films. Whatever you decide to do, it’s not hard to imagine location scouts coming up here and imaging how this place could be the perfect setting for Isengard, Beorn, or Boromir’s last stand.
Make sure you bring your Mavic Pro drone here because the views from up above are just stunning.
WHAT YOU NEED TO KNOW
This focuses on the Dart River Adventures horseback riding experience.
Address: 58 Coll Street, Glenorchy, New Zealand
Hours:
- Hobbits’ Hack – 9AM, 10:15AM, 1:30PM, 2:45PM (1:15PM, 2:15PM Winter)
- River Wild -9AM – 1:30PM (Summer) or 1:00PM (Winter)
- Winter season is May 1 – September 30 and summer season is October 1 – April 30
Getting here:
- Glenorchy is a 45min/ 48km scenic drive from Queenstown
- Parking is free at the check-in office
- For an additional $20 you can use their shuttle service from Queenstown to Glenorchy round trip. Also includes an hour of free time in Glenorchy
Price:
- Hobbits’ Hack – NZ$147 Adult NZ$126 Child
- River Wild – NZ$189 Adult NZ$179 Child
What’s included:
- They provide boots, helmet, gloves, and trench coat. Trench coat is optional and usually recommended for colder/wet weather
What to bring:
- GoPros are allowed but large DSLR’s are not. The reason for this is that there are no pockets or baskets on the horse so everything needs to fit on in your jacket or the trench coat. Problem is that some of the trench coats may have holes in the pockets so you can’t rely on them either. GoPros can be on something like a 3-way grip or head mount. Cameras are okay as long as they’re pocketable
- Recommend bringing your own gloves if you feel like you’re going to be cold
- Wear appropriate clothes for the outdoors. Layer if you’re unsure
- Your outer layer should be one with large accessible pockets if you want to bring a camera
- Camera neck straps are allowed
- Full length pants recommended
FAQ:
- No experience required and beginner friendly
- Fully guided
A Quick New Zealand Travel Guide
Money – You’ll never feel like cash is a necessity in New Zealand. Credit cards can carry you through pretty much through the whole South Island and the rest of the country. The only time we really needed cash was when we needed coins for the coin wash, and super local spots.
Tip : When exchanging avoid doing it at the airport as the rates are always worse than what you can get with an ATM withdrawal or at an exchange shop in the city.
When is the best time? – High season is during their summer which is December to February. As with other destinations, shoulder seasons are always the best so consider Spring (March – May) or Fall (September – November).
Getting here – Auckland (AKL) is the international hub if you’re looking to fly in direct. Following this in size are Christchurch (CHC), Wellington (WLG), and Queenstown (ZQN), and Dunedin (DUD). To put alerts on the flights and find the best deals, I recommend using Skyscanner.
How do I get around the South Island? – To get around the North Island, you’re either going to want to rent a car or travel with a company like Flying Kiwi. Car rental will give you ultimate flexibility but you’ll have to plan everything from top to bottom and gas can get quite expensive despite super cheap rental rates. Flying Kiwi is a great option for solo travellers or those wanting to just book something and show up. Make sure you head to the NZ travel guide for the discount code for car rental company Hitch.
Where should I stay? – The most comprehensive platform for bookings based on personal experience was Booking.com. They had everything from hotels, hostels, and guesthouses and we always managed to find an awesome place for a great place. As an alternative, there’s also Agoda and VRBO.
Curious where my top 4 stays in the South Island were?
QUEENSTOWN
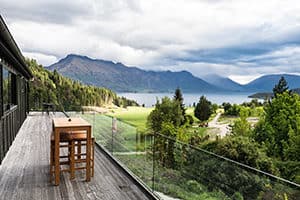
While not in downtown Queenstown, this converted upscale cottage home is set with the perfect view of Lake Wakatipu and The Remarkables. There’s an on-site maid which is why everything is so ridiculously clean. Bonus that it includes laundry facilities.
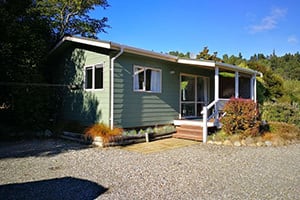
PUNAKAIKI

Set right by the beach and below the Punakaiki Valley, this is the optimal place to stay if you’re looking for somewhere that’s affordable and close to the Pancake Rocks. The lodges here are quite comfortable and come in different sizes to suit your travel party.
ABEL TASMAN
A ridiculously cheap family-run motel located in Marahau offers queen-sized studios for guests and conveniently located to all the water activities you want to do here and is a short walk away to the entrance of the national park.
CHRISTCHURCH

Modern hotel in the center of Christchurch that’s walking distance to Container Mall and 20 minutes from the airport. Each hotel receives 2GB of free wifi.
Do I need a visa? – If you’re on this list of countries, you don’t need a visa to enter New Zealand. If you do require a visa, reach out to your regional New Zealand embassy to apply for a visa.
Tip : New Zealand doesn’t mess around when it comes to their bio security. Answer their questions truthfully even when it comes to where your hiking boots have been and snacks you’re bringing in. You don’t want to be slapped with a heavy fee when their sniff dogs or high-tech bio-sensitive x-rays catch you.
Do I need travel insurance? – As always, travel insurance is highly recommended. My philosophy is that you want to make sure you’re covered in case the unknown happens. Make sure to read our guide on choosing the right travel insurance for you. Overall, World Nomads has the best balance of price and coverage.
How about you? What are your top favourites from your travels in New Zealand’s South Island? Do you have a question planning your upcoming trip? Drop a comment down below.
What you should read next
Leave a Reply