The awesome power of mother earth is seen on full display along the Tongariro Alpine Crossing. There will be times on this trail that it’ll feel like you’re on a completely different planet as you hike up the saddle between Mount Ngauruhoe and Tongariro. From giant craters, snow capped peaks, remnants of lava flows, razor sharp pumice, fiery red crust, vivid Emerald Lakes, and ethereal jungle forest, there’s no other trek that takes you through such a dynamic change in both elevation and ecosystems.
It’s no wonder the Tongariro Crossing is often described as one of New Zealand’s best one-day hikes. On top of the incredible and unreal landscape, this area was also used as the inspiration for Mount Doom of Mordor in the Lord of the Rings trilogy.
This guide is a thorough run through and review of the entire hike that does take a little bit of equipment preparation, booking in advance for the right shuttle, and being mentally prepared to know what to expect. As many have mentioned, the 19.4km trek is one heck of a work out. With the information here, you’ll be ready to conquer Mordor with ease.

Read more about New Zealand
- Top 10 things to do in the North Island
- What to pack for a trip to New Zealand
- The ultimate NZ Travel guide
- Comprehensive 3 week itinerary
Where to stay near Tongariro?
- More details below but if you’re hoping to stay in Taupo, our favourite accommodations to choose from are Rainbow Lodge Backpackers for those on a budget or Hilton Lake Taupo if you’ve got Hilton Honors points or looking for something a little bit more luxurious.
In This Article
- Tongariro Crossing packing checklist – what to bring
- Transport to Tongariro Crossing – getting there and back
- Hiking trail description and sections
- Side Trails and Alternative Treks
- Facilities along the crossing
- Differences between summer and winter
- Lessons we learned
- Where to stay
- What to do after the hike
Tongariro Crossing packing checklist – what to bring
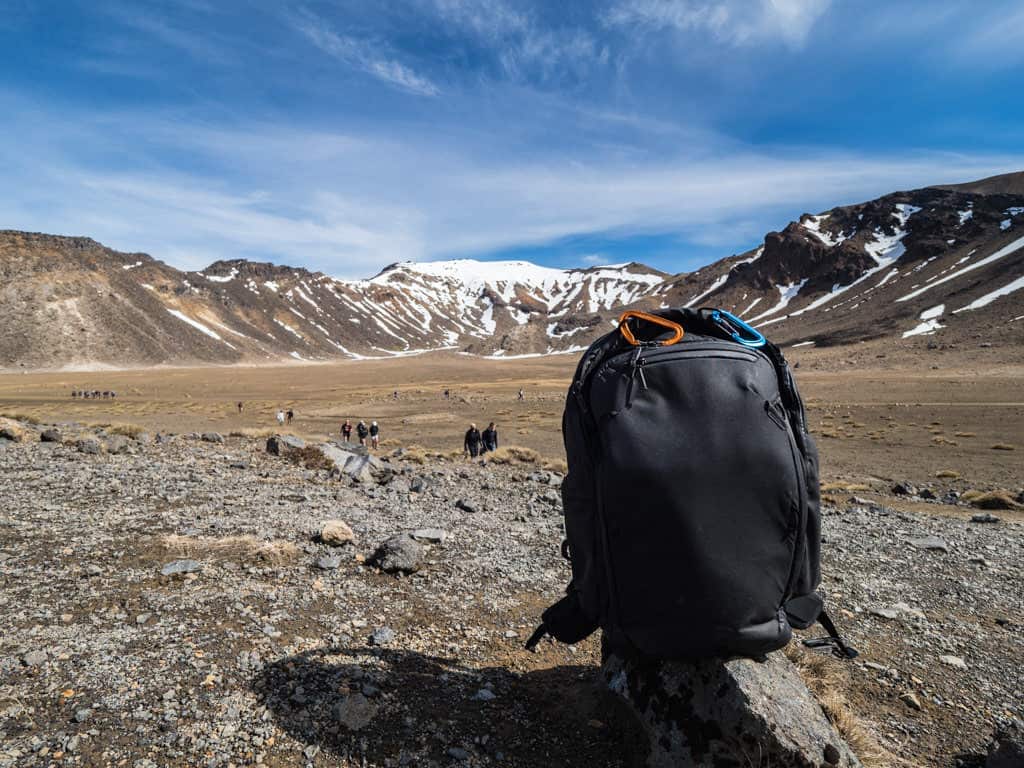
If you were like us, the day prior to our hike, we were in a bit of a panic trying to figure out what we needed to bring and how to pack our backpacks.
No matter what time of year it is, the key is to be prepared for all weather conditions and to be well equipped to tackle this hike. It’s not your typical walk in the park so you want to be ready.
- Water: Recommended to bring 2 litres of water per person. If you’re looking for a range 1.5 – 3 litres is appropriate with the upper end for those planning on doing side trails
 Food: You’ll need to prepare your own lunch and sacks. Go for a grocery run the night before
- Waterproof jacket: You never know when it’ll rain. Acts as a good windbreaker as well
- Waterproof pants (optional): Not absolutely necessary unless you know it’s going to rain on your day
- Thermal layers: Long johns if it’s cold but not absolutely necessary, base layers, and fleece
- Hiking pants: You’ll likely have these for your New Zealand trip so not necessarily anything special. These are the ones I have at home
- Hiking shoes/boots: This is no joke. You want to have really good hiking shoes here because the terrain is rocky, slippery, icy, and uneven. Get a shoe like the Conspiracy Outdry
- Hat and/or beanie: I brought both – start your day with the beanie and as it warms up, switch to a hat for sun protection
- Sunglasses: Or sunnies as they call them in NZ
- Sunscreen: There’s no cover for most of the hike so make sure you apply and reapply many times. With the ozone layer depletion near New Zealand, it’s so easy to get burnt here
- Chapstick: New Zealand is in general very dry so having this handy is always helpful
- First aid kit: You never know what’ll happen. A small first aid kit should suffice.
- Map: Not like it’s easy to get lost because there are so many people on the trail but Tongariro Expeditions provides a handy map that gives you an idea of the trail and more importantly, how long it takes for each section.
- Cellphone: The only way to reach out to your shuttle to let them know you’re late is with the cellphone so it’s handy to have
- Winter gear: Crampons and ice axe are needed in extreme winter conditions. You can rent them with your shuttle operator
 Food: You’ll need to prepare your own lunch and sacks. Go for a grocery run the night before
 Sunglasses: Or sunnies as they call them in NZ
TIP – Layering : The temperature will change drastically from the morning dawn to the peak at noon and in the forests late afternoon. Dress in a way where you can easily just take off layers as you need to. As an idea, we started with full winter gear when we first started and towards the end my jacket was in my backpack and I was only wearing my half-zip base layer.
TIP – Packing : This is a long hike and you don’t want to be carrying too much on your back beyond the necessities mentioned in the checklist above. You want to pack as light as possible so chuck out anything you won’t need and leave them in your hotel.
Transport to Tongariro Crossing – getting there and back
Since the Tongariro Alpine Crossing is a one way track, you will need some sort of shuttle to make the logistics work. Here are the two options available to you.
Use a shuttle

For most of you, you’ll be staying overnight in either Taupo, Turangi, or perhaps even the Tongariro Holiday Park (known as base camp). In order to get to the trailhead, you’ll need a shuttle bus ride and that’s where Tongariro Expeditions comes in.

Here’s how it works if you’re staying in Taupo. At roughly 5:20AM in the morning, a bus will come around to all the hotels and hostels in town to pick everyone up. It will then proceed to make pick ups along the way before dropping everyone off at 6:50AM. In the afternoon, they run a similar shuttle system from the other end of the trail (Ketetahi car park). There are multiple departures between 1:30PM-4:30PM and these are announced to you in the morning. These buses will again drop you off where they picked you up.
To me, there’s no other company to book with as they’re the biggest in town and I had a great experience with them. They made the whole logistic side of things so easy and on top of that they’re the beauty is that they’re not that expensive either.
TIP – Need hiking sticks? : The shuttle busses carry extra hiking sticks for you to borrow for free which is why they’re not on the list of things you can rent.
Drive yourself and use a shuttle one way
So what if you’re not staying in one of those pick up points or if you’d prefer to just drive right into the national park? Well you’re still kind of faced with a problem. The hike is one way so you in theory park at one of the lots but how would you get back to it later or vice versa?
Inevitably, you’ll need a shuttle and here’s how it works. There’s a special shuttle bus parking lot in Ketetahi (where the Tongariro trek normally ends) and Tongariro Expeditions makes pick ups from here in the morning (6:30AM, 7:30AM, or 8:30AM) to the trailhead. This takes roughly 30 minutes. When you finish your hike, you’ll be to walk straight to your car.
This shuttle is even more necessary since starting from October 2018, they’ve started to enforce a 4 hour parking time limit at Ketetahi and Mangatepopo public parking lots. That’s why they had to create a private Tongariro shuttle car park.
Hiking trail description and sections
The Tongariro Alpine Crossing is a one-way 19.4 trail. It starts at Mangetepopo and through the saddle between the two mountains (Tongariro and Ngauruhoe), up to a peak and then downwards through a few lakes created by craters and finally down to Ketetahi.
The track takes 6-9 hours to complete depending on how you approach it. If you’re running through it without taking too many breaks, you can certainly get to the end in 6 hours but if you’re taking a lot of photos (that would be me) or lots of breaks (that would be me as well) you’re going to easily take 8 to 9 hours.
Timing is very important as I learned if you read our 3 week NZ itinerary. That’s why I’ll make mention in the section below, where you should roughly be if you want to make that last shuttle bus back into Taupo.
The Tongariro Crossing is logically divided into 8 major sections that I’ll break down for you.
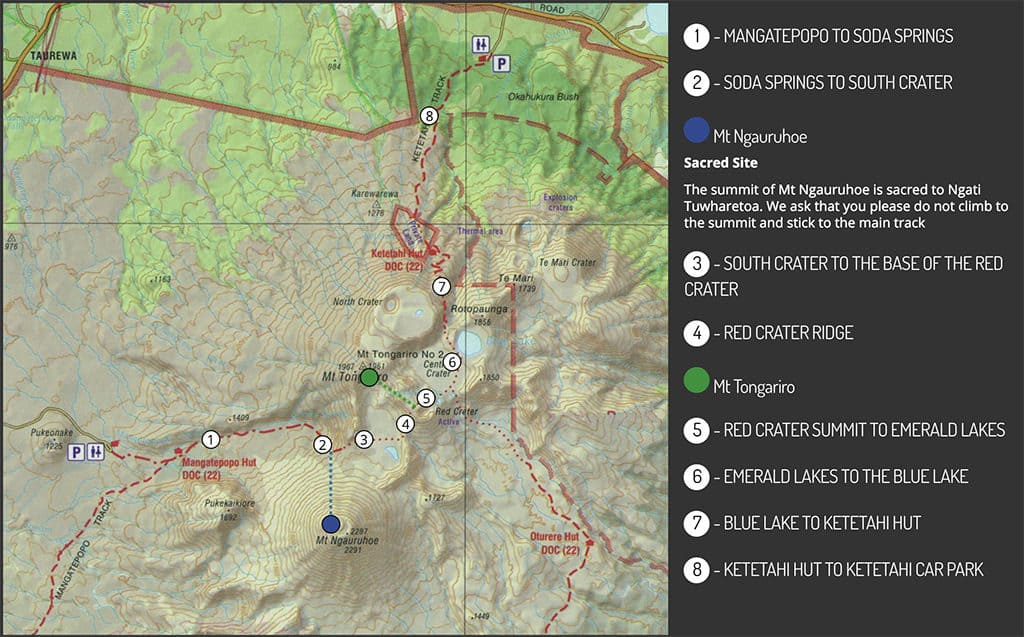
1 – Mangatepopo to Soda Springs

From the drop off point in Mangatepopo, you’ll be hiking along the board walk with the sun slowly peeking through Mt. Ngauruahoe. It’ll be cold at this point so make sure you have all your layers on but this is also where you’ll be the most energetic. It also helps that it’s very flat here. You’ll be following the Mangatepopo Stream all the way through.

This section reminded me the most of Mordor with the jagged rocks on the cliffside and barren landscape that surrounds you. This is also juxtaposed with the lush growth surrounding the stream.
The early part of the hike is also where you’ll be clustered with the most amount of people.
Difficulty: Easy flat
Duration: 1 hour
2 – Soda Springs to South Crater
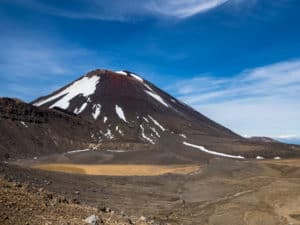
The flat walk doesn’t last of course and once you start swinging a right to face Mt. Ngauruahoe, you’re faced with a steady climb up towards the South Crater known as Devil’s Staircase. The ascent is manageable though and you’ll be able to appreciate the views from here as you look back at where you came from. It’s quite spectacular.
You’ll still be relatively close to quite a number of hikers here. Luckily there’s a lot of space to work with there aren’t any challenges with overtaking groups or falling behind.
Difficulty: Challenging ascent
Duration: 1 hour
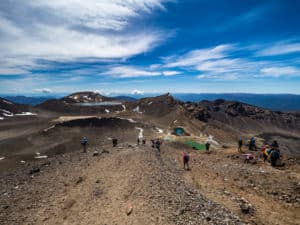
3 – South Crater to Base of Red Crater

This section is incredibly easy again because it’s a flat open plain. To your left you’ll see the mountain ridge of Mt. Tongariro and to your right will be Mt. Ngauruahoe in plain sight. Along the way you’ll of course pass by small lake which will either be covered in snow or you’ll see some water. For us, we found this spot to be great for a snack and we were hungry enough to eat part of our lunch.
At this point, hikers will start to spread out a little and won’t feel crammed at all.
This is also considered to be the point of no return which means that if you’re experiencing any trouble on your way up so far and need to go back to where you started, this is as far as you want to to go as the next part is going to be very steep. Weather wise, if it’s starting to turn for the worse, this is also a good point to turn around.
Difficulty: Easy flat
Duration: 10 minutes
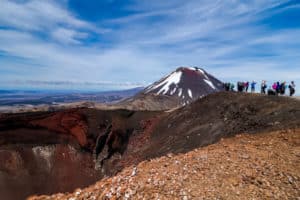
4 – Red Crater Ridge


This is the steepest part of the whole track and for some may be the hardest. It’s mostly all loose gravel on the way up but I never found that traction was problem. There is one section of the climb where there are chains to use as a hold. Parts of it will have drops on both ends but available track is wide enough where you never feel like it’s dangerous.


You’ll eventually get to a plateau that offers awesome views of the red crater. It’s at this point where it makes sense for another extended break and lunch. Depending on the time of the year, there may be a lot of snow up here or a little bit. For us, there was a small patch left and so there were a ton of people throwing snowballs and fooling around.

Personally, we didn’t find this part to be all that bad. Part of that might be from our experience doing the Inca Trail but all we did was pace ourselves with a lot of breaks and photo stops as we made our way up. I know some guides will say this can be scary but for someone that’s afraid of heights, I didn’t find that the case and the chains did little to worry me as this is nothing close to what Angel’s Landing was in Utah.
Difficulty: Hard ascent
Duration: 1 hour – 30 minutes of intense climbing, 30 minutes of photos and break
Time to leave: 11:30AM is the latest you want to be up here
5 – Red Crater Summit to Emerald Lakes

This section is probably one of the most frustrating ones out of the whole crossing because of how downplayed its difficulty is. On paper, this looks to be an easy descent from the trail’s summit down to the lakes but in fact you’re dealing with an incredible amount of erosion from the traffic this trail receives everyday. The whole way down is unstable loose rock which creates a slip and slide scenario for those that aren’t comfortable with this terrain.
This is where having good hiking shoes make a difference because I saw unprepared tourists completely give up and just slide down on their butts. It was a sad sight. While it may feel unnatural, the best way down is to actually try to go down as fast as you can because it’s the stop and go that makes you lose balance easily. To give you an idea of how loose the rock is, when we were near the lakes, we were almost hit by rolling rocks tumbling down from the top.
As you can imagine, the crowd of hikers start bunching up again because of how treacherous the downhill is.
When you get to the top of the Emerald Lakes, you’ll want to take a ton of photos and at a few of the iconic spots, there’ll be a line up so be prepared for that.
Difficulty: Challenging descent
Duration: 50 minutes – 20 minutes of actual descent and 30 minutes taking photos
Time to leave: 12:30PM
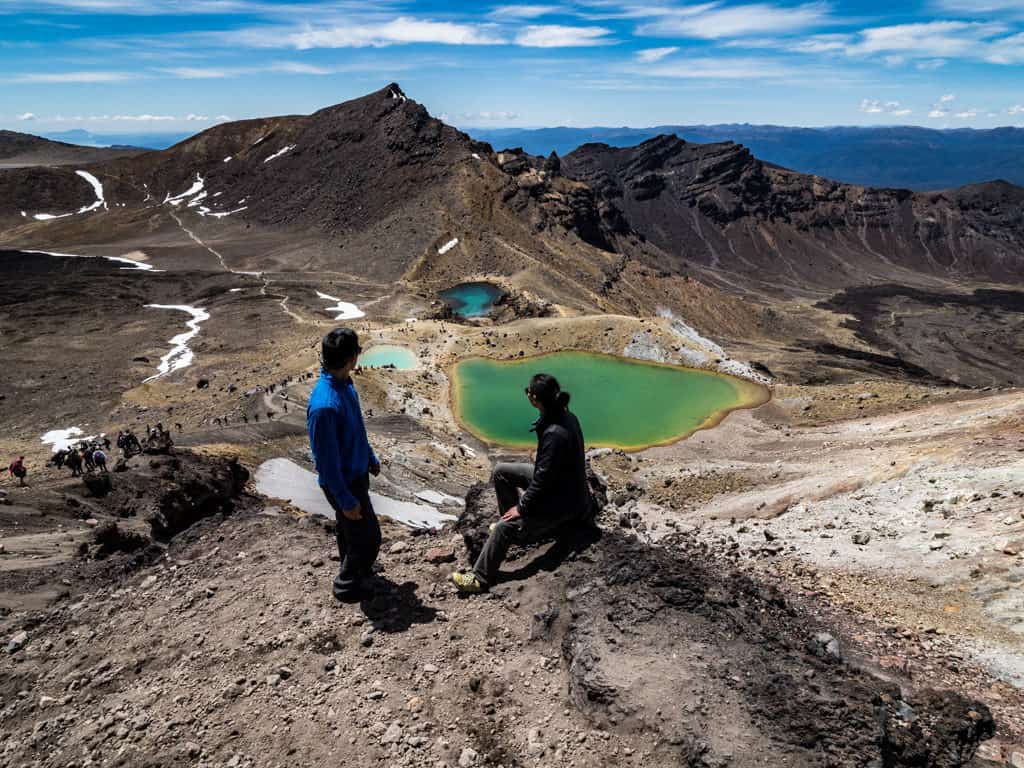
6 – Emerald Lakes to Blue Lake

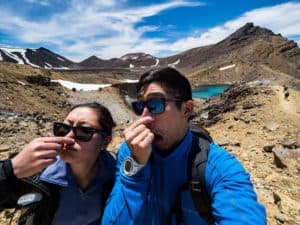
The Emerald Lakes are stunning to look at especially the hues of colours that reflect off the water and lush growth where you wouldn’t expect at this altitude. There’s also quite a bit of geothermal activity here as well so you’ll see and hear a number of steam outlets from the ground.

You can spend as much or as little time as you’d like here but if you’re like us, you’ll want to take the long way around to explore each of the Emerald Lakes. Once you finish, there’ll be a gentle climb up to the Blue Lake.

For us, we realized we spent too much time here (our last bus departure was 4PM and not 4:30PM) so by time we got to this sign post, it was 1:30PM and it said there were still 2.5 hours to go. That’s when a bit of panic set in.

Difficulty: Easy descent and ascent
Duration: 50 minutes
Time to leave: 1:30PM
7 – Blue Lake to Ketetahi Hut

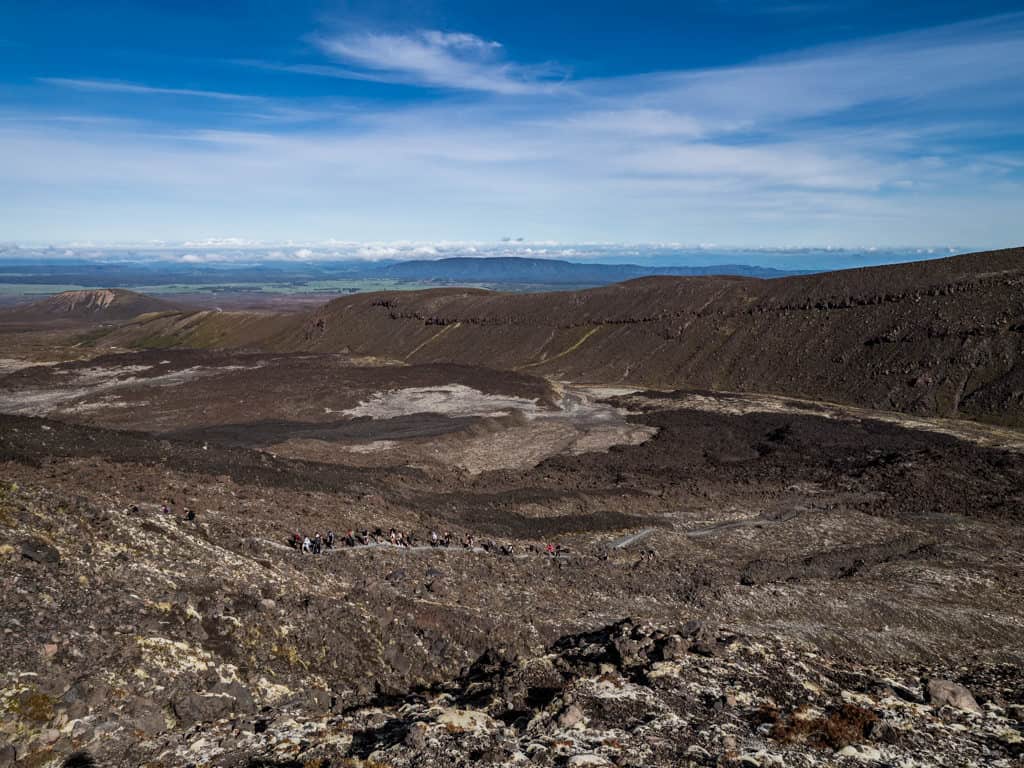
At this point it’s literally all downhill from here. This section follows the Rotopaunga Valley down the North face of Mt. Tongariro and makes large sweeping switchbacks all the way down. Along the way you’ll see a few smoking chimneys from the ground to further show how active the area still is. Looking out into the horizon, you’ll also see Lake Taupo and all the greenery down below.

While a long section, the good news is that you’ll be able to see your target almost all the way through. The Ketetahi Hut can be seen from quite the distance. Eventually you’ll make it to this old hut which is a great place for a bathroom or snack break.
The trail narrows down here and so you’ll find yourself stuck behind slower hikers or having to make a move to pass others.
Difficulty: Easy gradual descent
Duration: 1 hour
Time to leave: 2:30PM
8 – Ketetahi Hut to the Car Park


The sign from Ketetahi Hut says it’s 1 hour 30 minutes to the car park but realistically it is closer to 2 hours. That’s what makes this last segment extremely challenging. While it may not be physically difficult because it’s just a gradual downhill but it takes you through so many different terrains and eventually down to a forest that follows a stream before winding out to the exit. Just when you think you’ve gotten to the end, there’s more.
This is where “are we there yet” syndrome starts to set in.
For us, we were lucky enough to be following 2 hikers that were also rushing to make it back down so they set the pace. It started off as a a fast hike but once we got down the forest area at 3:30PM, we more or less sprinted all the way through. By some miracle, we made it to the bus right at 4PM where it then departed at 4:04PM.
Difficulty: Easy descent but hard because it’s very long
Duration: 2 hours
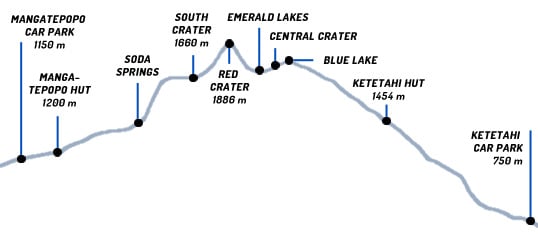
Cross section profile
If you take a look at the cross section of the entire 7-9 hour hike, you’ll see elevation profile from start to end. It’s a hike that ascends the saddle between the two mountains of Mt. Ngauruhoe and Mt. Tongariro before descending into a collection of sulphuric lakes and down the backside.
Side Trails and Alternative Treks
Along the way there are a number side trails and alternative treks that are available. Here’s what you need to know about them.
Soda Springs
Before you start your ascent from Soda Springs, there’s actually small detour out to a waterfall in the corner. This track is a 15 minute round trip detour before going up Devil’s Staircase. This is a boggy area full of vegetation that surrounds the small waterfall.
Time: 15 minute return
Mt. Ngauruhoe and Mt. Tongariro Summits
In the past, these were tracks that you could do but out of respect of the Ngati Tuwharetoa, neither of these summits are recommended or condoned.
Northern Circuit
If you’re looking for a serious challenge, this is a 2-3 day track that requires hut and transportation bookings. You can start and finish at either Mangatepopo or Whakapapa village. More planning and research is required for the Northern Circuit.
Tongariro Traverse
This trek takes you through the southern part of Mt. Ngauruahoe and also passes through Mt. Ruapehu. It’s a 7-9 hour hike that’s roughly 22km one way. This is an alternative track that’s much easier than the Alpine Crossing and Northern Circuit. There is not too much information about this track so definitely reach out to Tongariro Expeditions about your options.
Facilities along the crossing
Here are the available facilities that you’ll find during your hike.
Toilets

You’ll be surprised to find a number of toilets along the track. There are in total 8 facilities with the main ones being at the Mangetepopo starting point, South Crater, right after Blue Lake, and at the Ketetahi Shelter.
These are essentially porta-potties and do come with toilet paper but bring your own if you worry they’ll run out. I’d also recommend bringing your own hand sanitizer.
In the main areas there are usually a cluster of 3 or 4 together which is really convenient. Things usually get busy after lunch so we found that there were big line ups after Blue Lake so try to go either before (South Crater) or after (Ketetahi Shelter).
Huts

For those doing a different track that requires overnight, huts need to be reserved ahead of time. In the case of poor weather, you can use these huts for shelter. The two main huts you’ll see on the trail are: Mangeepopo Hut and Ketetahi Hut.
Water

There is no drinking water outlets available. Do not drink water from the streams because of their high mineral content (read as toxic) and the sink that’s available at Ketetahi Hut is also not drinkable as it’s collected from rainwater and meant to be used if filtered and boiled.
Garbage
There are no bins at all so whatever you bring in has to come out with you.
If you need a waste bag, ask your Tongariro Expeditions bus driver for a bag.
Differences between summer and winter
Between the two extreme seasons in New Zealand, you’ll notice a number of differences that’ll change how you hike the Tongariro Alpine Crossing.
Summer
Summer time is the best time to hike as the snow has melted and it’s usually very clear and calm. Since the track is very clearly marked, highly-trafficked, it’s almost impossible to get lost.
Best time of the year to go is between November to April.
Winter
When winter comes, it’s a whole other animal. This is primarily between the months of June to August.
The landscape is completely different at this point because everything is covered in snow. This is what makes it so majestic but also much more dangerous. Extreme snow and wind await, and to make your way through the crossing will require special equipment such as crampons and ice axe. Another challenge is being able to follow the track itself. There are usually poles and signs to follow but if visibility is poor, it is possible to get lost. That is why using a guide in the deep of winter makes sense.
If you’re in New Zealand in the winter and still want to do it, the best time to attempt it would be between September and October where you’ll still find remnants of the snow at the highest peaks but everything else has thawed for the most part.
One thing to keep in mind during shoulder seasons is that there’s always a high possibility of rain so you have to check in with your shuttle operator to find out if the track is open the next day or not.
Lessons we learned
I created this guide out of personal experience from doing the Tongariro Crossing and it was quite the experience. If I focus on the key takeaways from what we learned, here is what I’d boil it down to, to make it easier for you when you go.
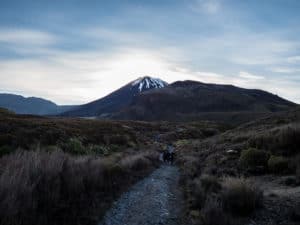
Favourite part – The best part of the hike is near the beginning of the trail where you’re threading through the valley while the sun rises above the towering Mt. Ngauruhoe which surprisingly is more beautiful than its twin mountain and the hike’s namesake. This is also the part of the hike that gave me serious flashbacks to Frodo and Sam as they snuck through the razor-shop rocks of Mordor.
Manageable uphills – The truth is that most of the hike wasn’t insanely hard and nothing compared to something like Dead Woman’s Pass on the Inca Trail. All the ascents are manageable as long as you take lots of breaks in between. When you’ve had enough, the trail usually levels out for a nice long pause.
The hardest part – The hard part was actually the descent from Red Crater Summit to Emerald Lakes (section 5). This part consists of massively eroding loose gravel that seems like a short distance but lasts for an eternity because 1) there’s no good foothold at all 2) the ground slips underneath you without notice 3) others that really don’t have the right footwear act as big obstacles and 4) it’s the spine of a ridge and so there’s drop off on both sides. It’s not something that most guides talk about so that’s why I highly recommend good shoes and perhaps a bit of slip and slide confidence.
Crowds – We weren’t even there during high-season (mid November) and the trail was already quite packed. Let’s just say there was never a point when it was just us. Don’t expect to get any clean photos unless you start really early and hike really quickly.
Time management – I detail this out in the Ultimate 3 Week Itinerary but the bottom line is that you need to watch your time if you’re using a shuttle service. In November when we went, the last bus was 4PM and not 4:30PM which meant that we needed to be much faster than we thought.
Most of this guide is assuming the last bus is 4:30PM so for example where we should’ve left Ketetahi Hut by 2:30PM, we really needed to be out there by 2PM. In reality, we didn’t leave the hunt until 2:45PM so you can imagine how much of a time constraint we were on for that last section. We hustled like crazy to make it back to the bus.

WHAT YOU NEED TO KNOW
Location: Book with Tongariro Expeditions to start your hike at the Mangatepopo Car Park
When: There are two pick up times in Taupo – 5:20AM and 6:20AM. Pick up times at the end of the trail happen between 1:30 – 4:30PM but in our case, it was 2PM – 4PM (seasonal reasons).
Price: NZ$70 adult or NZ$35 child round trip from Taupo. Alternatively if you’d like to park at the Ketetahi lot, you can hire a shuttle
Alternative services: If you have a car and you’d like to park on the Ketetahi side, you can hire a one-way shuttle to Mangatepopo. Pickups are from 6.30AM-8.30AM. There is a special Tongariro shuttle parking lot for this
Tips:
- This hike is very weather dependent so you do need to check-in with Tongariro Expeditions the day before to see if they’re running or not
- Stock up on lunch, snacks, and water the night before
- Shuttle buses leave on time – We did not want to find out what would happen if we arrived after 4PM. Our bus left at 4:04PM so that tells you just how on time they are
- Free hiking sticks – You’ll notice that hiking sticks can’t be rented from Tongariro Expeditions and that’s because they them for free to borrow on the bus. It’s not something they disclose but a pretty sweet perk
- Pay attention to colour of bracelets – Anyone with Tongariro Expeditions will have a rubber bracelet. Your bus will be one colour and other buses will be another colour. If you’re the first bus and notice other colours start creeping up on you, that’s when you know you’re starting to follow behind
FAQ:
- What happens if you don’t make the bus? – They instructed us to call them if we knew we wouldn’t make the last bus but I found that hilarious because I don’t had signal the whole hike. Just don’t be late.
- Are drones allowed? No
Where to stay
If you’re looking for the best area to stay in preparation for the Tongariro Alpine Crossing, your best bet is the city of Taupo. Situated right at the northern shores of Lake Taupo, this is the largest city from the hike and is where you’ll find the largest selection of properties. In addition, most of the shuttle services such as Tongariro Expeditions originate from here so you’ll have no problem finding your way to the trailhead.
WE STAYED HERE

A popular hostel in Taupo that is very affordable. The location is convenient as you’re walking distance to the Pak’N’Save and the restaurants by the lake. A lively place with a large kitchen and open lounge. Take advantage of their $5 burger nights.
GREAT ALTERNATIVE

One of the few Hilton properties in New Zealand. A first-class hotel with a free pool, gym, and on-site Bistro Lago Restaurant by chef Gareth Stewart. Rooms are spacious and luxurious.
What to do after the hike
When you’re finally back in Taupo or wherever you’re staying the night, you probably won’t want to do a whole lot. You’re be sore, you’ll be tired, and you’ll feel gross.
After you clean up and possibly have a short nap, I have a couple of ideas for what you could do.
- Food – Re-energizing your body will probably be high on your list. Consider a meal at Dixie Brown or Mole & Chicken
- Spa – If it’s still before 8PM, you can definitely make it out to Spa Thermal Park to loosen and relax those muscles in this natural hot springs. Alternative you can pay for a fancier experience at the DeBretts Spa & Resort
- Lake Taupo – Take a relaxing and slow-paced stroll along Lake Taupo and watch a brilliant sunset
Looking for an outdoor adventure focused tour?
We’re normally not fans of tour busses. I’m Chinese born Canadian and growing up, all I did was travel around North America in those Chinese bus tours. Gross! Then I found out about Flying Kiwi as I planned our trip to New Zealand and what I read really intrigued me.
It got to the point that we actually ended up booking with them for a big part of our New Zealand trip and they’re a company that I’d totally recommend. Not only is it about the convenience factor of not having to do the driving or planning but it was so much more about the people that we got to get to know and being able to do everything as a family. On top of that, it’s the first bus tour where it’s 80% camping which I thought was so perfect for New Zealand.
Anyways, I worked out a deal with them to offer you guys a special discount and I hope you’ll be able to enjoy! The Tongariro Crossing is part of the Grand Traverse!
Book with Flying Kiwi

If you’re looking for an incredible experience around New Zealand without the stress of planning it all out yourself, the chance to travel with amazing people, and explore New Zealand the way it was meant to be seen – the outdoors with a ton of adventure, check them out!
Use the Flying Kiwi promo code “GOINGAWESOMEPLACES” to get a free sleeping bag rental (valued at NZ$60) for your entire trip!
So there you have it, everything I know about the Tongariro Alpine Crossing. What was your experience with the track for those that have done it? If you’re thinking about it, what lingering questions do you still have? Drop a comment down below!
What you should read next
Leave a Reply